

Pres-N-Snap Tool Instructions | Die Installation Guide | HooVer Products
Pres-N-Snap® Tool Setup & Installation Instructions
Step 1: Identify the Correct Pres-N-Snap® Die Set
Before installing fasteners, confirm that you have the correct die set for your specific fastener type and brand.
Each die set is engineered for a particular combination of fastener brand (e.g., DOT™, Fasnap™, Stimpson™, YKK™) and fastener type (snap, grommet, turn lock, etc.). Using the wrong die may result in misalignment or fastener damage.
If unsure, visit our Pres-N-Snap Dies page or contact our team for assistance
Step 2: Removing Installed Dies
If your Pres-N-Snap tool already has the correct dies installed, you may not need to change them. If you do, follow the steps below to safely remove the upper and lower dies.
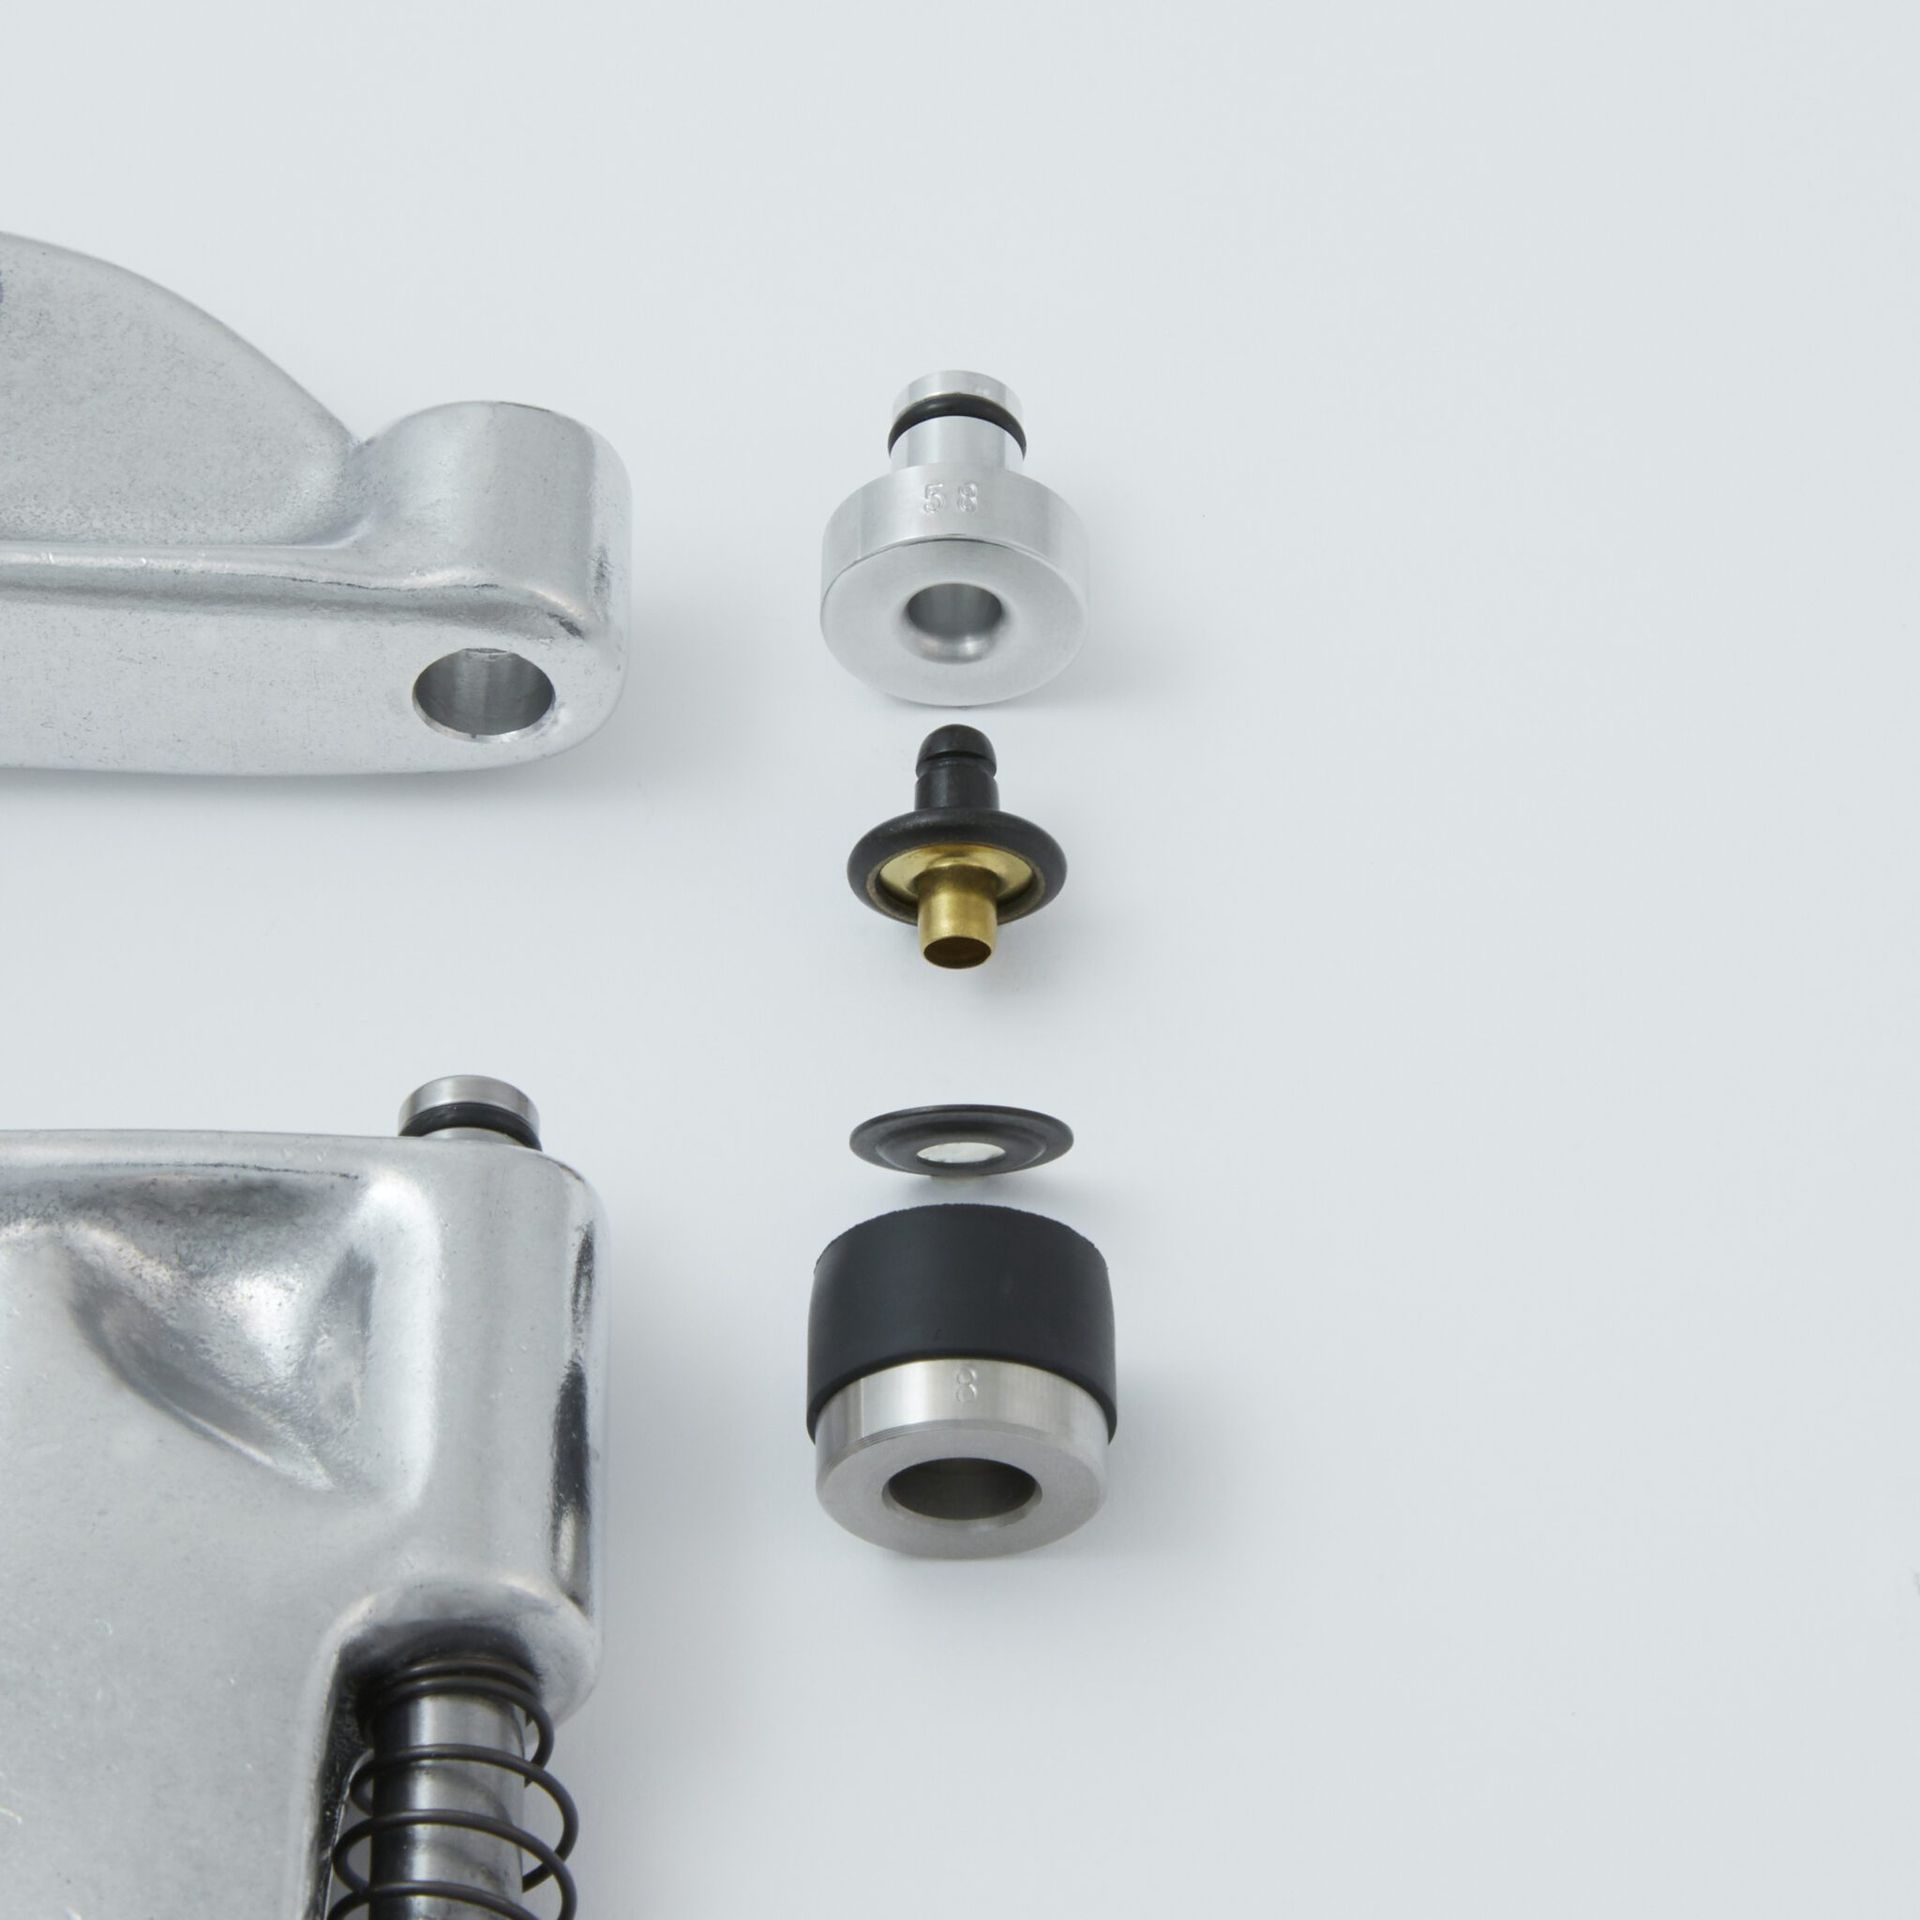
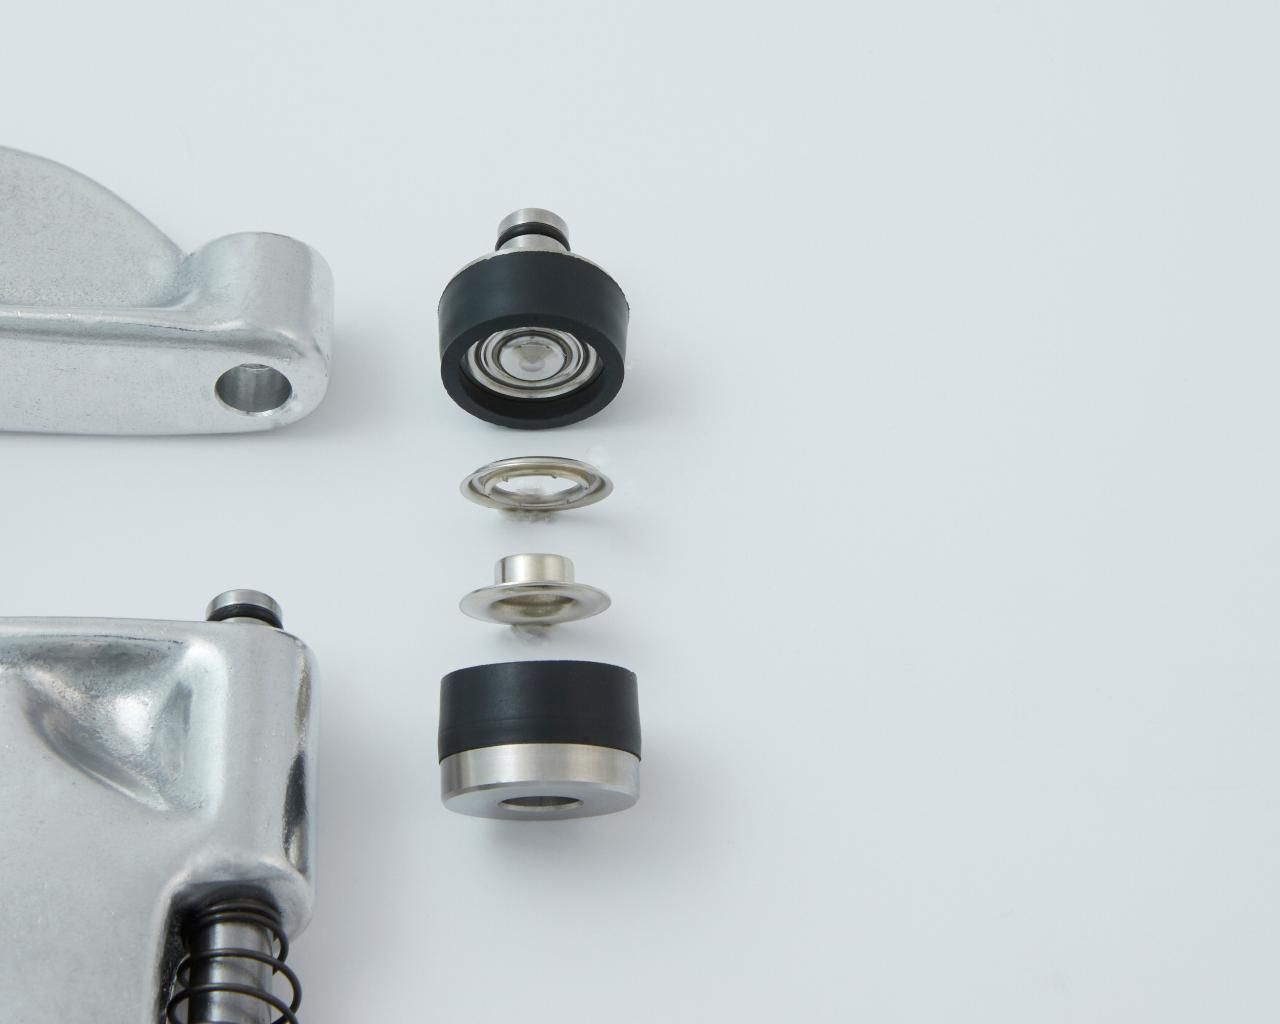
Removing the Lower Die
- Locate the plunger/shaft at the bottom of the tool.
- Grip the lower die and pull it off the plunger while gently rotating.
- The die is held in place by a small “O” ring on the shaft — leave the ring in place.
Removing the Upper Die
- Locate the top of the frame inside the C-shape of the tool.
- Grip the upper die and pull it downward toward the center of the tool while rotating gently.
- The upper die has its own “O” ring on the die shank to keep it secure.
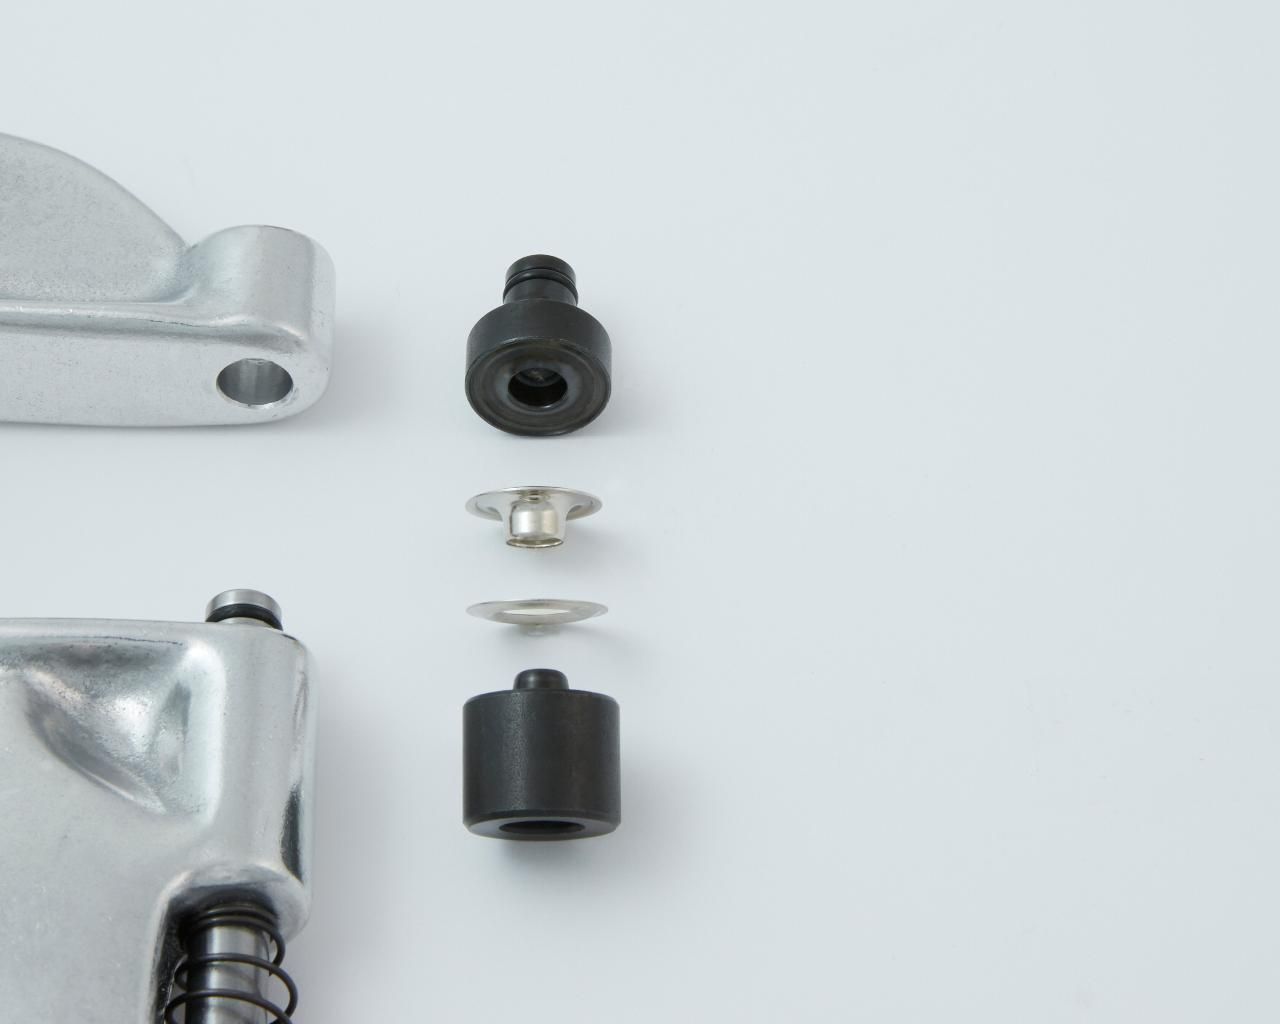
Step 3: Installing Pres-N-Snap® Dies
Your Pres-N-Snap may already have the correct dies installed for your fasteners and you may not have to change them. Caution: Never stack a die on top of another die already installed on your tool.
From the center of the C-shape part of the tool, push the upper die into the hole at the top of the frame. You may find it helpful to push and slightly rotate at the same time. The upper dies are the dies with a small “o” ring on the die shank.
Next, slightly press/close the handle of the tool, which raises the plunger/shaft. With the plunger/shaft slightly raised, install the lower die onto the plunger with a small “o” ring on it by pushing the die into place. You may find it helpful to push and slightly rotate at the same time. When properly installed, the die should spin freely on the plunger.
With the handle fully closed, turn the adjusting end bolt until the dies come in contact with each other. Then, back-off 1/4 of a turn. This will bring the tool closer to proper adjustment for the new die set.
Step 4: Installing Fasteners
With your tool adjusted and dies installed, you’re ready to install fasteners. Follow the instructions below based on your fastener type.
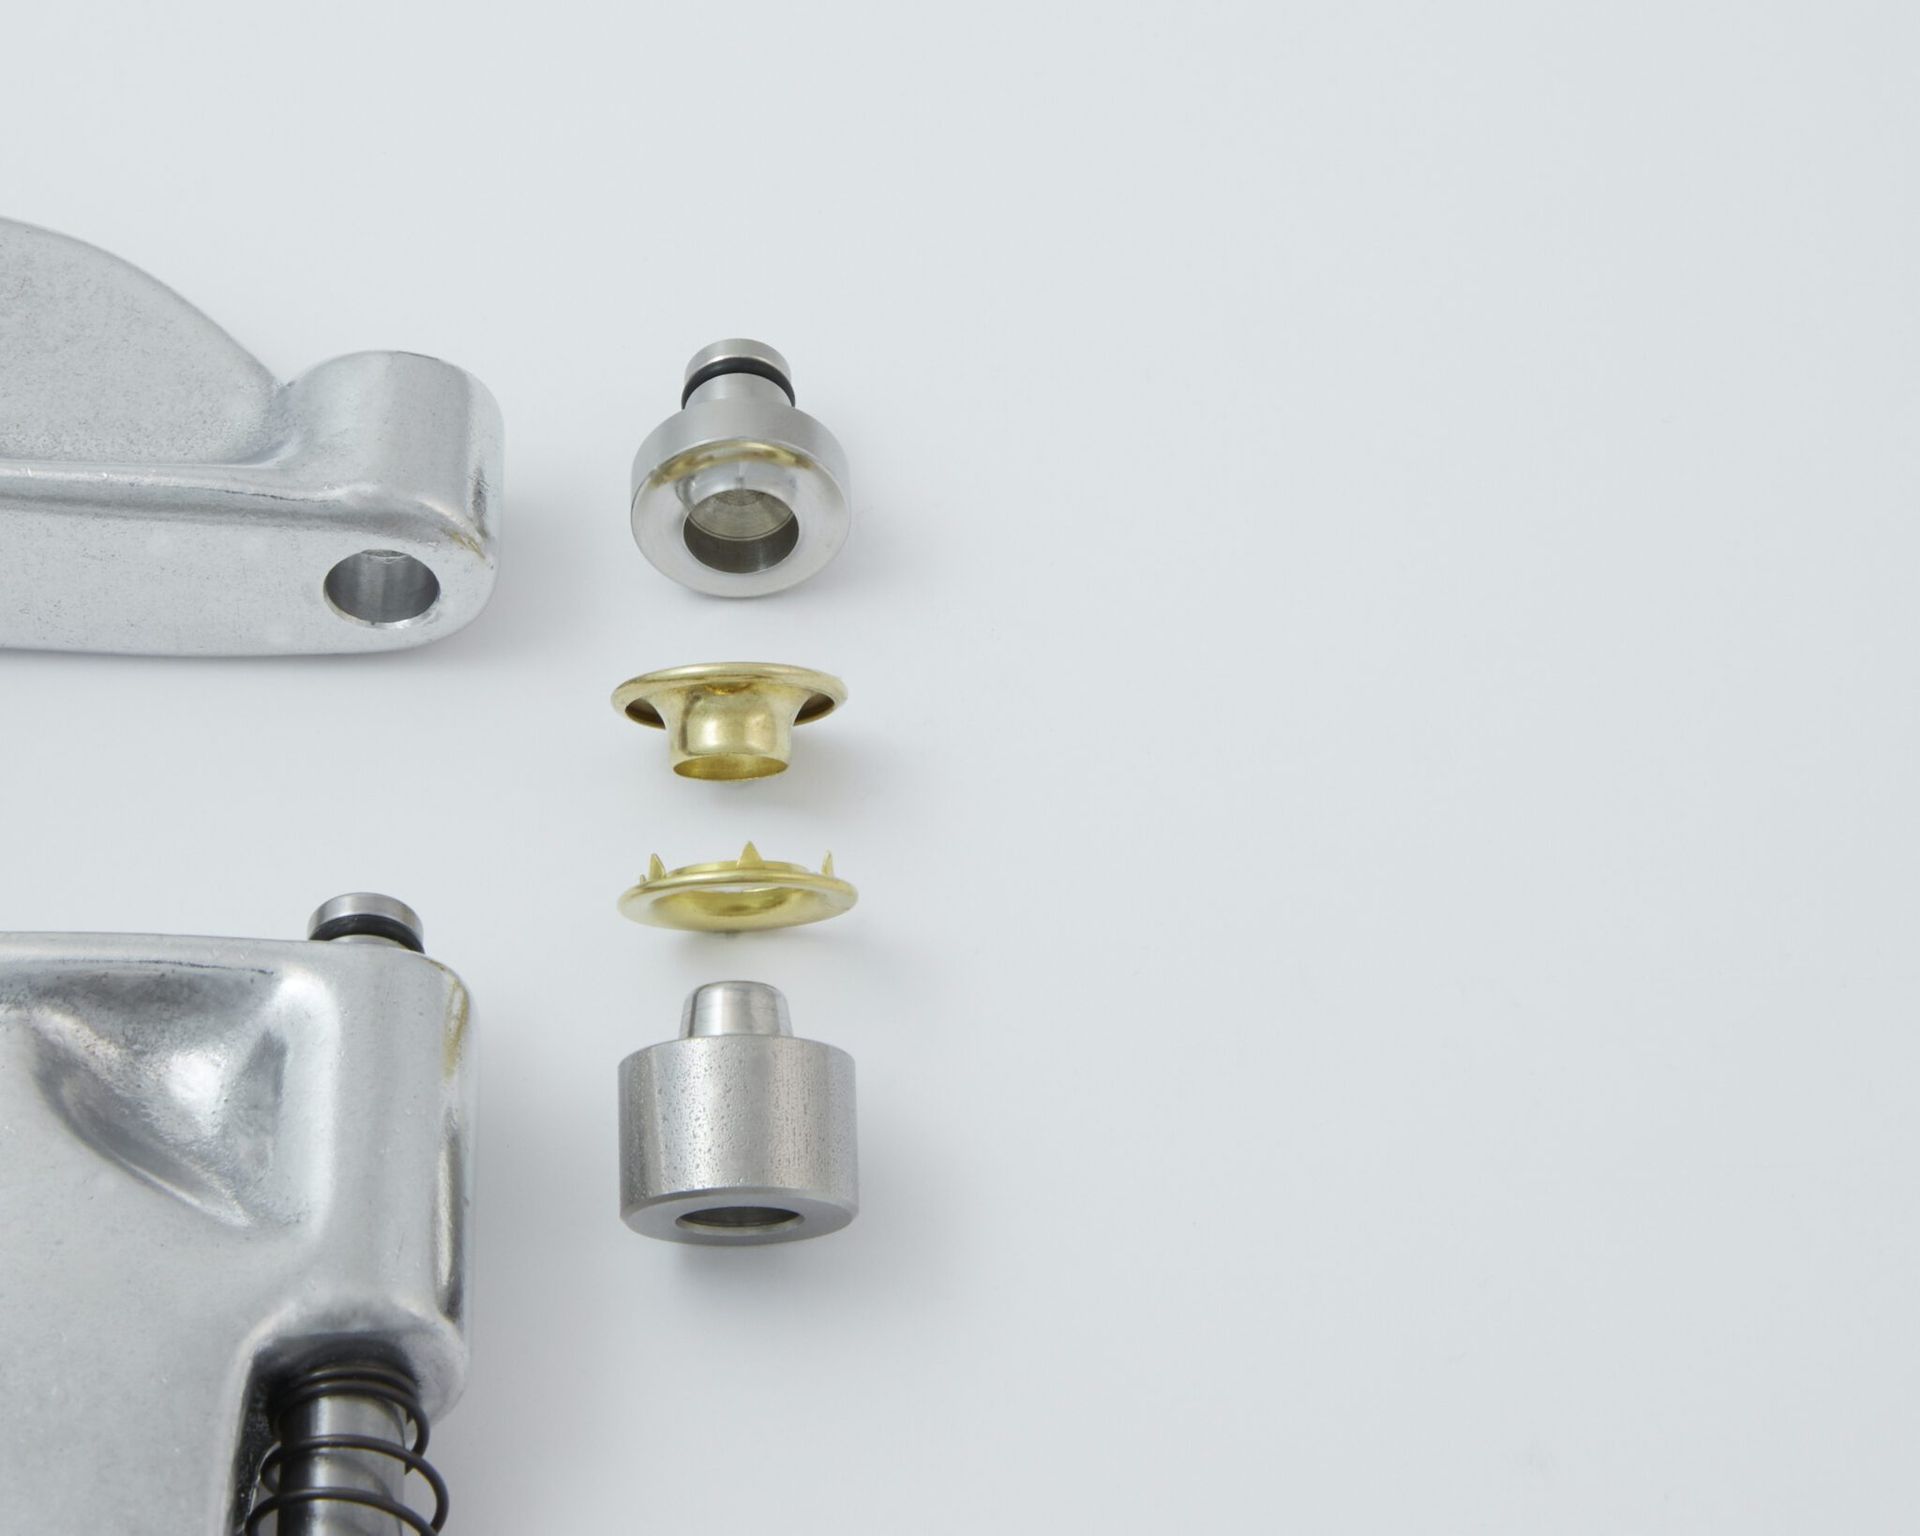
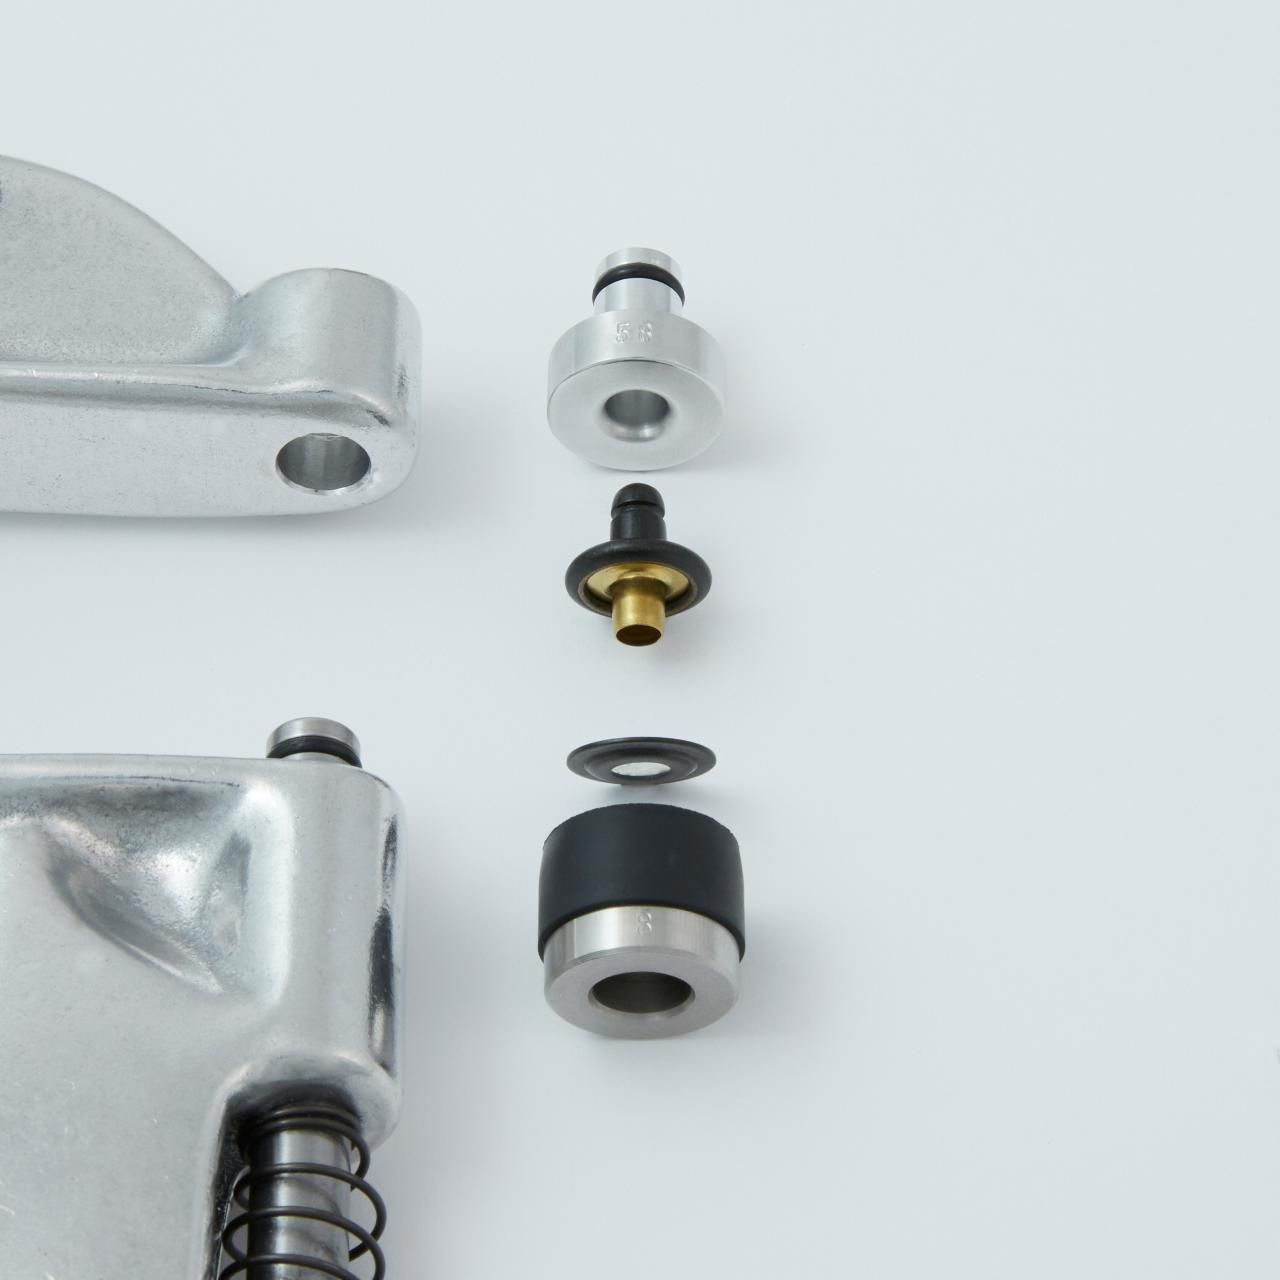
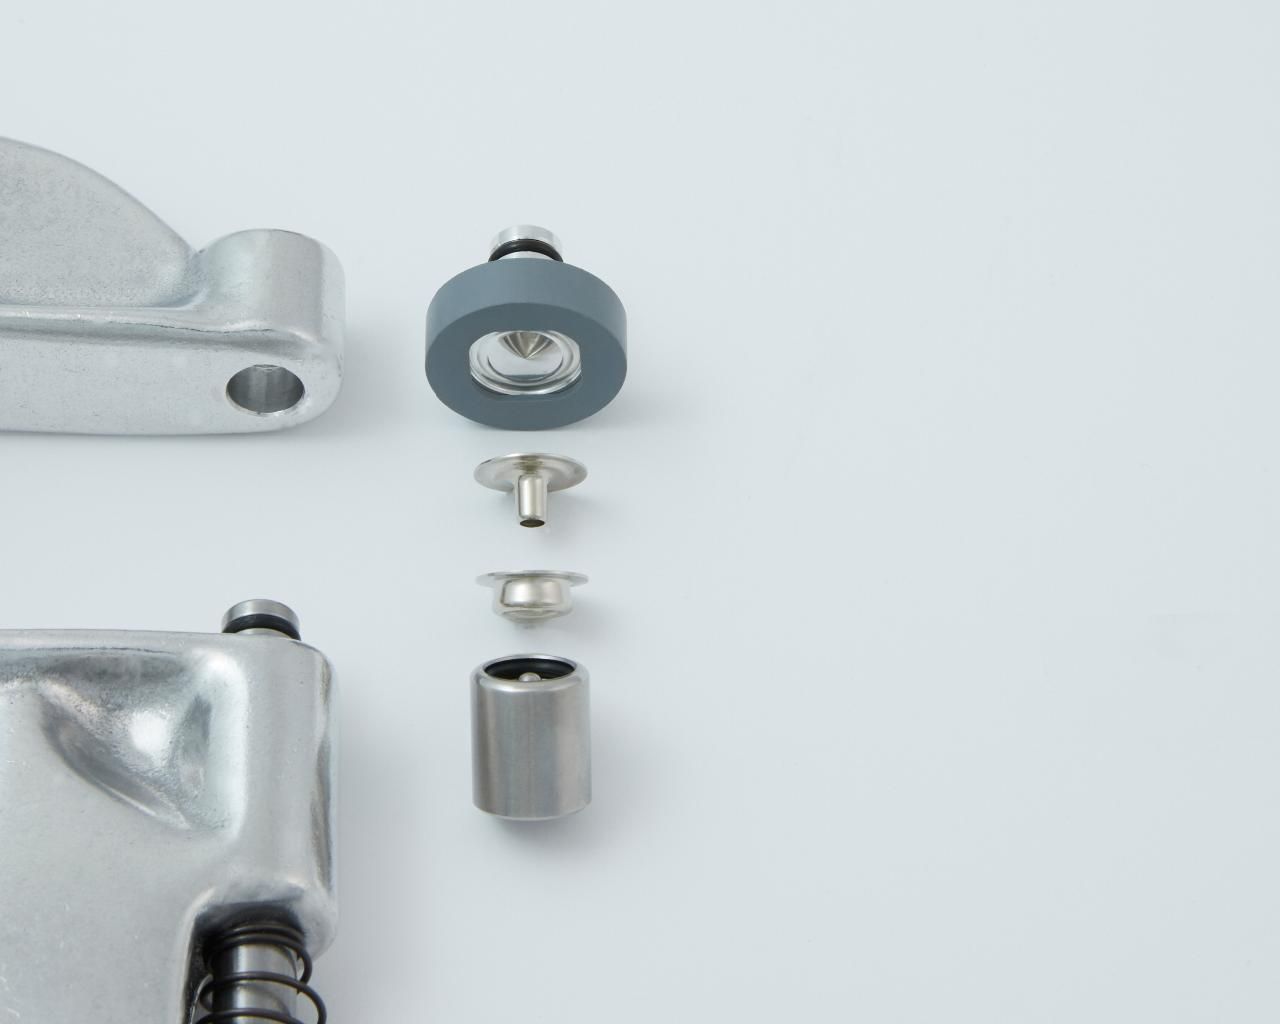
A) Installing Standard 24 Ligne Snap Fasteners (Button/Cap and Socket)
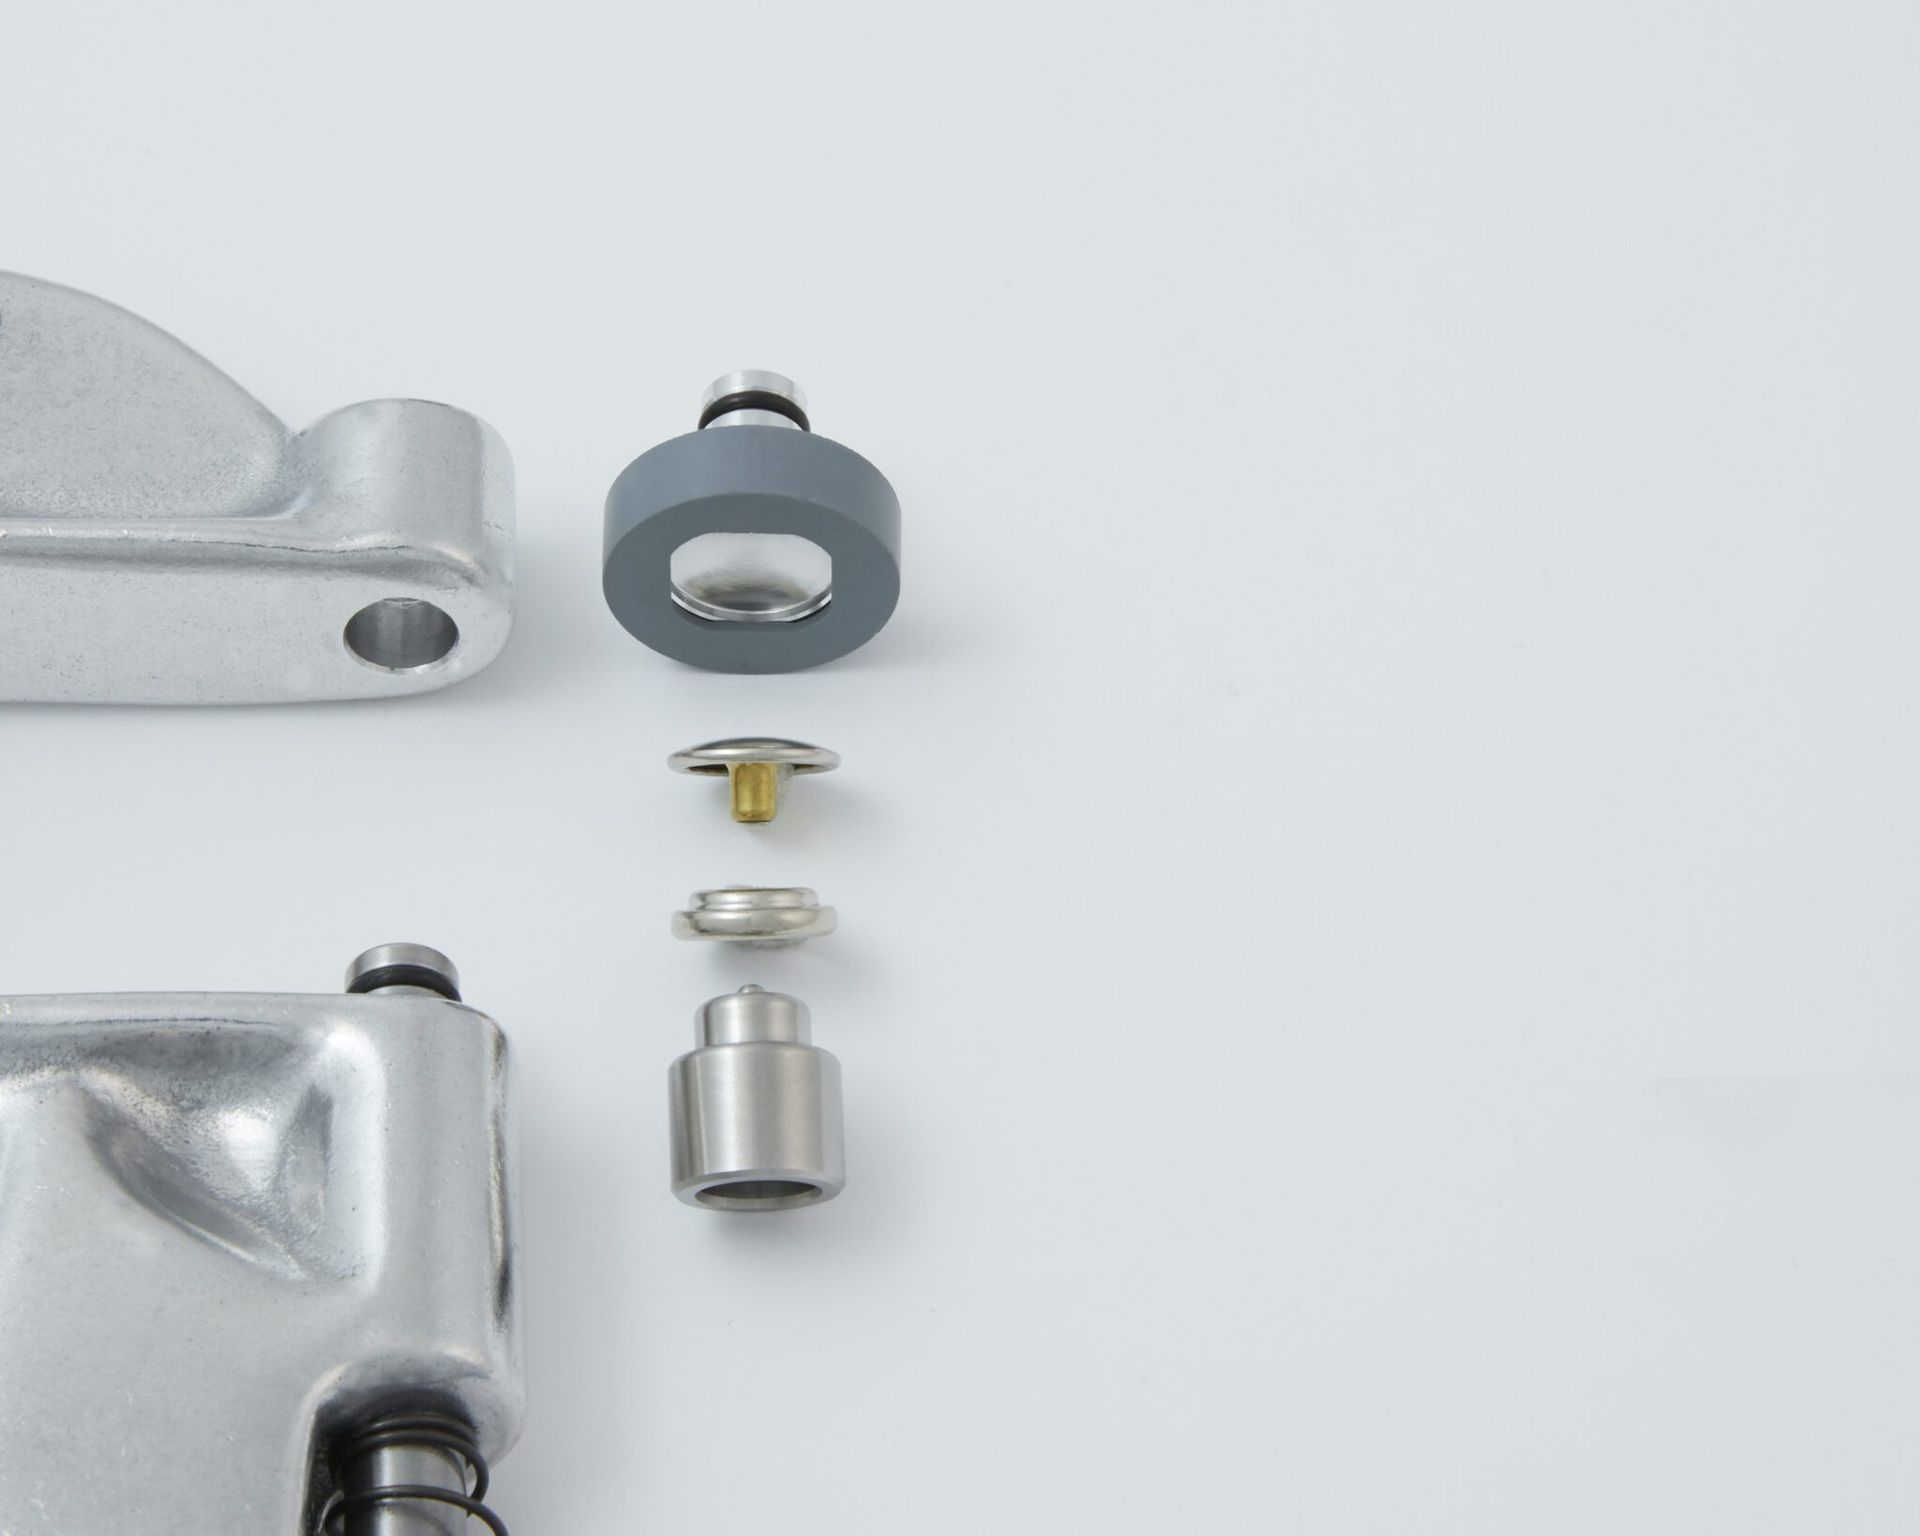
Snap your socket fastener onto the socket die.
Next, place your button/cap fastener into the button/cap die. The button/cap die has a concaved, inward curve to it. The decorative domed button/cap side should nest nicely into the die. A gray rubber retainer on the die will hold the fastener in place during the installation process.
Adjust the tightness of the fasteners using a piece of scrap fabric folded to the same thickness/layers as your project. Caution: If your fasteners are too loose, your fasteners may tear out over time. Over tightening may cause distortion to the fasteners and can damage the dies. Place your fabric between the dies and press/close the handle of the tool all the way. When properly installed, the fasteners should not rotate when set in fabric.
If your fasteners are loose: Turn the adjusting end bolt clockwise to tighten. Leaving the die in place, remove the gray rubber retainer from the upper die to prevent damaging it. Then, carefully press/close the handle being certain that the fasteners are properly aligned with the dies. Once satisfied with how tight the fasteners are, reinstall the gray rubber retainer.
If your fasteners are too tight: Turn the adjusting end bolt counterclockwise.
You are now ready to install your fasteners on your project.
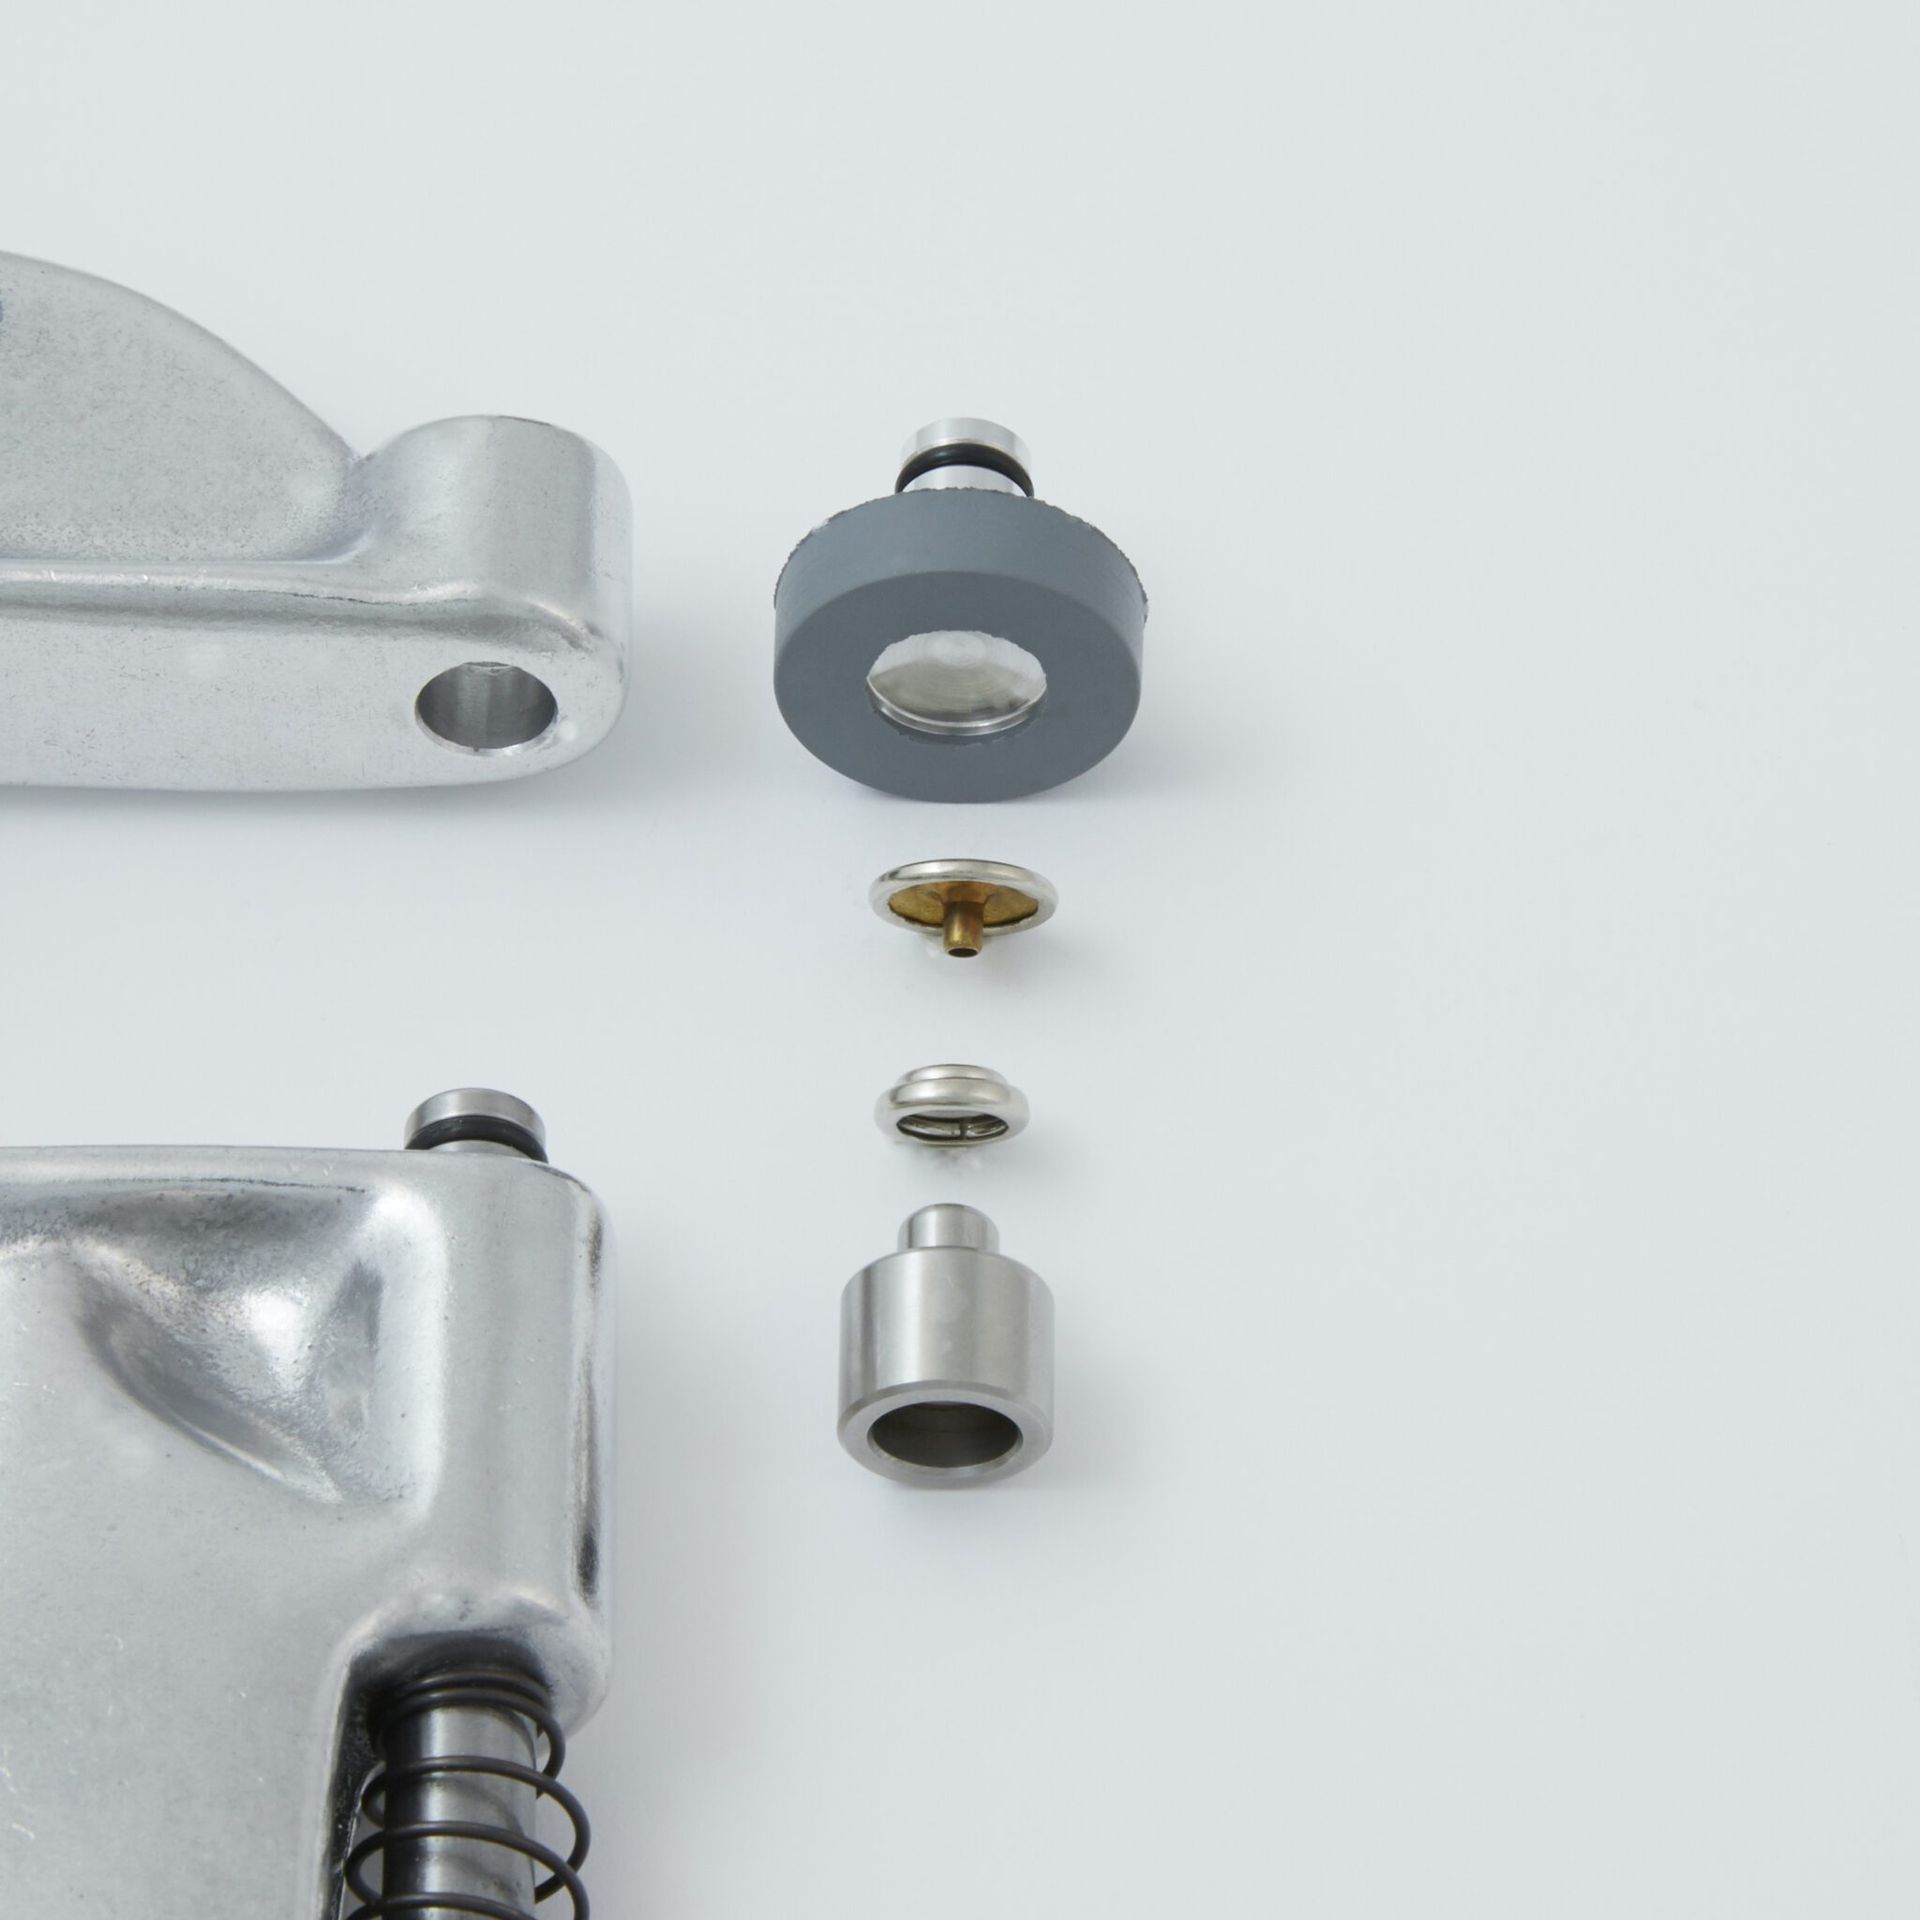
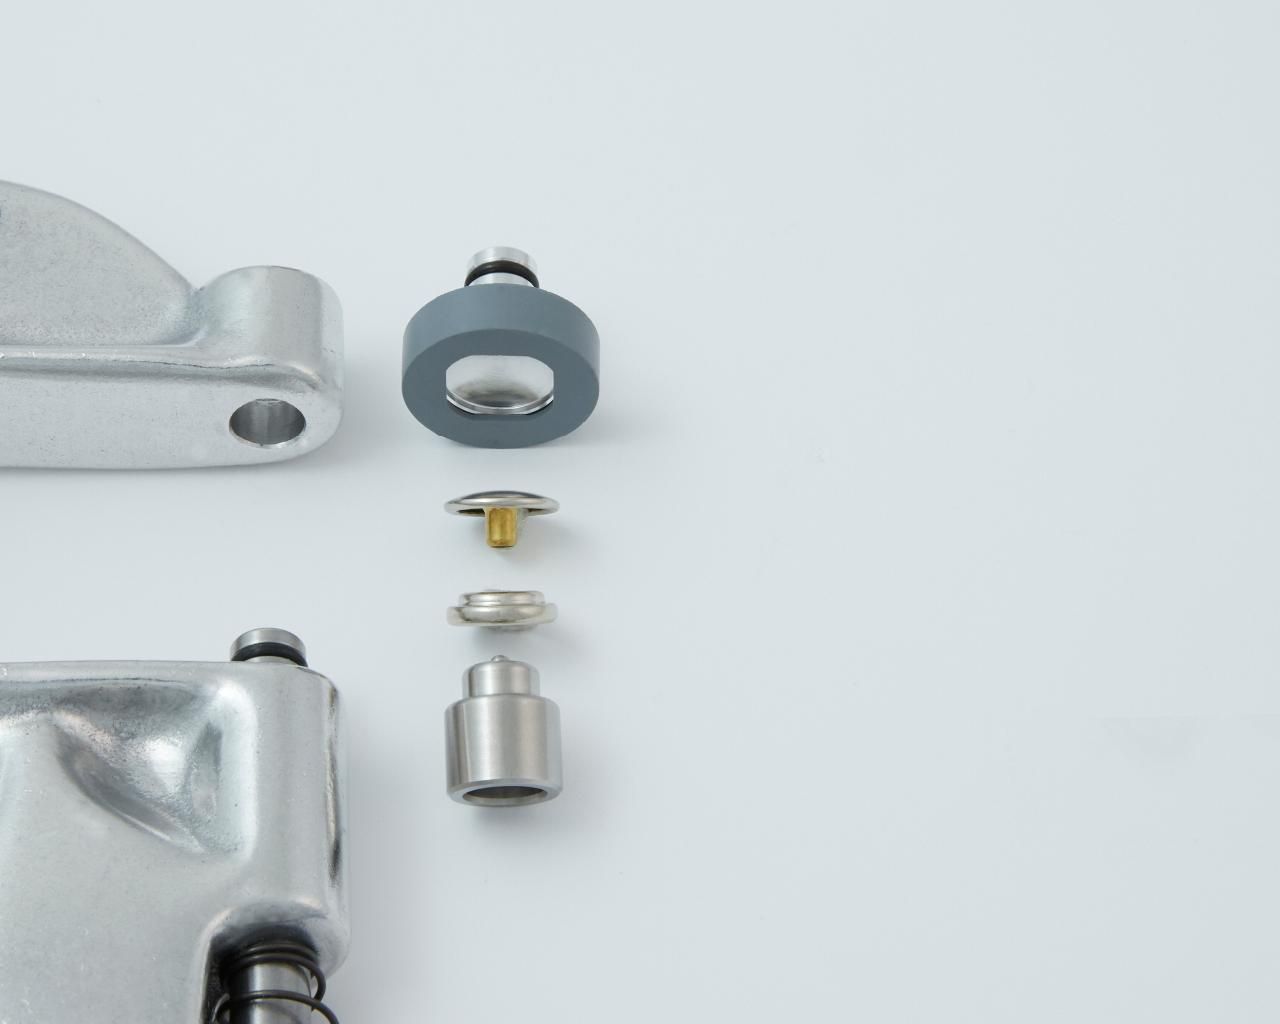
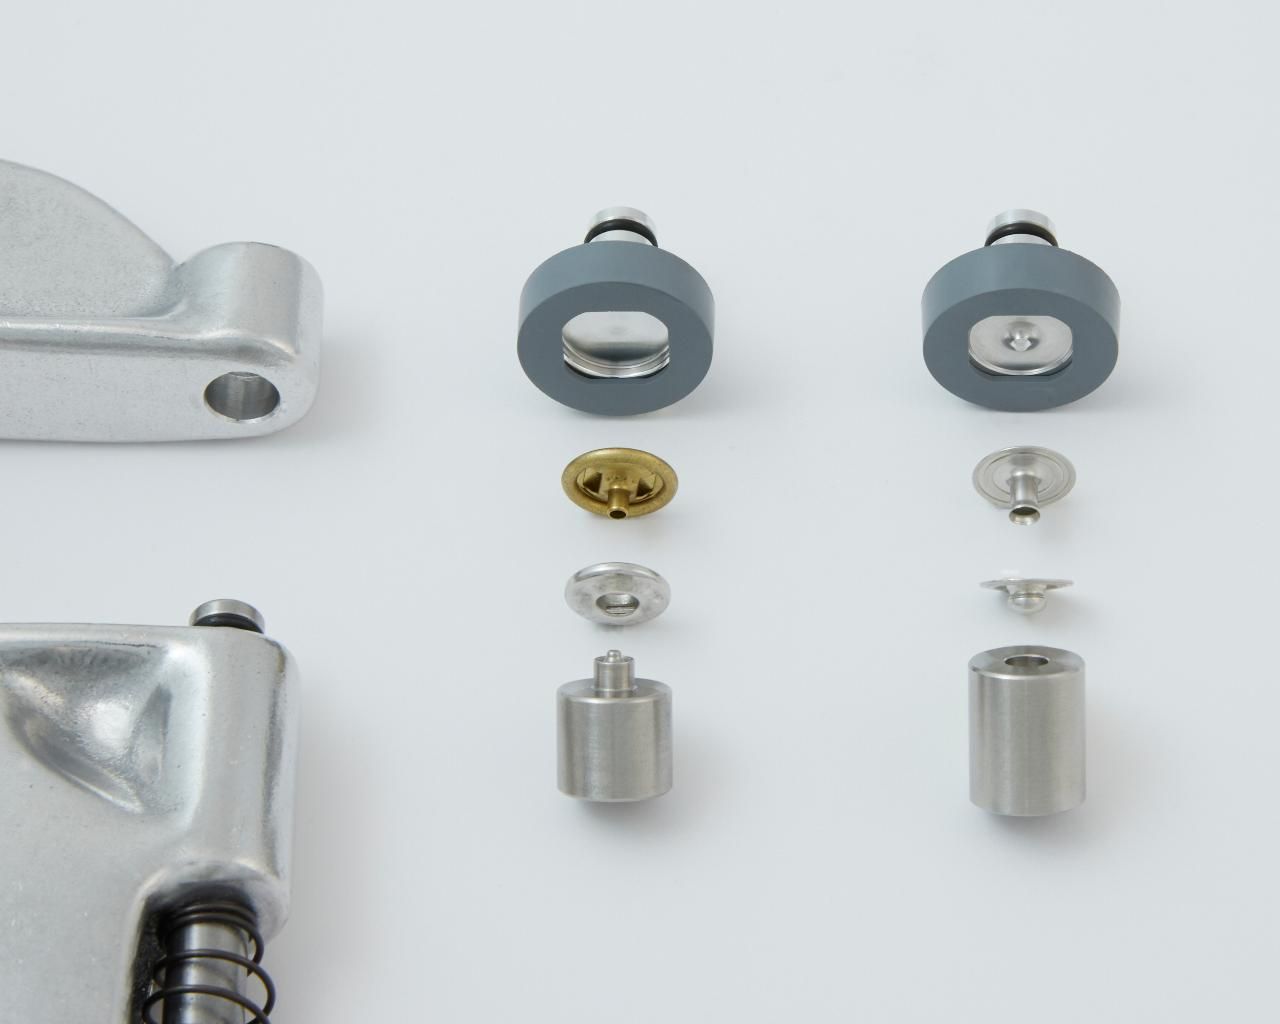
B) Installing Standard 24 Ligne Snap Fasteners (Eyelet/Post and Stud)

Press your stud fastener onto the stud die. The stud fastener is held in place with a large “O” ring on the inside of the stud die.
Next, place your eyelet/post fastener into the eyelet/post die. The eyelet die has a mostly flat surface to it. The flat part of the eyelet/post fastener should nest nicely into the die. A gray rubber retainer on the die will hold the fastener in place during the installation process.
Adjust the tightness of the fasteners using a piece of scrap fabric folded to the same thickness/layers as your project. Caution: If your fasteners are too loose, your fasteners may tear out over time. Over tightening may cause distortion to the fasteners and can damage the dies. Place your fabric between the dies and press/close the handle of the tool all the way. When properly installed, the fasteners should not rotate when set in fabric.
If your fasteners are loose: Turn the adjusting end bolt clockwise to tighten. Leaving the die in place, remove the gray rubber retainer from the upper die to prevent damaging it. Then, carefully press/close the handle being certain that the fasteners are properly aligned with the dies. Once satisfied with how tight the fasteners are, reinstall the gray rubber retainer.
If your fasteners are too tight: Turn the adjusting end bolt counterclockwise.
You are now ready to install your fasteners on your project.
C) Installing 20 Ligne Baby Snap Fasteners (Button/Cap and Socket)
Snap your socket fastener onto the socket die.
Next, place your button/cap fastener into the button/cap die. The button/cap die has a concave, inward curve to it. The decorative domed button/cap side should nest nicely into the die. A gray rubber retainer on the die will hold the fastener in place during the installation process.
Adjust the tightness of the fasteners using a piece of scrap fabric folded to the same thickness/layers as your project. Caution: If your fasteners are too loose, your fasteners may tear out over time. Over tightening may cause distortion to the fasteners and can damage the dies. Place your fabric between the dies and press/close the handle of the tool all the way. When properly installed, the fasteners should not rotate when set in fabric.
If your fasteners are loose: Turn the adjusting end bolt clockwise to tighten. Leaving the die in place, remove the gray rubber retainer from the upper die to prevent damaging it. Then carefully press/close the handle being certain that the fasteners are properly aligned with the dies. Once satisfied with how tight the fasteners are, reinstall the gray rubber retainer.
If your fasteners are too tight: Turn the adjusting end bolt counterclockwise.
You are now ready to install your fasteners on your project.
D) Installing 20 Ligne Snap Fasteners (Eyelet/Post and Stud)
Press your stud fastener onto the stud die. The stud fastener is held in place with a small gray rubber retainer on the stud die.
Next, place your eyelet/post fastener into the eyelet/post die. The eyelet die has a mostly flat surface to it. The flat part of the eyelet/post fastener should nest nicely into the die.
Adjust the tightness of the fasteners using a piece of scrap fabric folded to the same thickness/layers as your project. Caution: If your fasteners are too loose, your fasteners may tear out over time. Over tightening may cause distortion to the fasteners and can damage the dies. Place your fabric between the dies while holding the eyelet fastener in position on the die and carefully close the handle of the tool. Once the eyelet fastener is held in place with tension from the tool, you no longer need to hold the fastener in place. Continue pressing/closing the handle until all the way closed. When properly installed, the fasteners should not rotate when set in fabric.
If your fasteners are loose: Turn the adjusting end bolt clockwise to tighten. Carefully press/close the handle being certain that the fasteners are properly aligned with the dies.
If your fasteners are too tight: Turn the adjusting end bolt counterclockwise.
You are now ready to install your fasteners on your project.
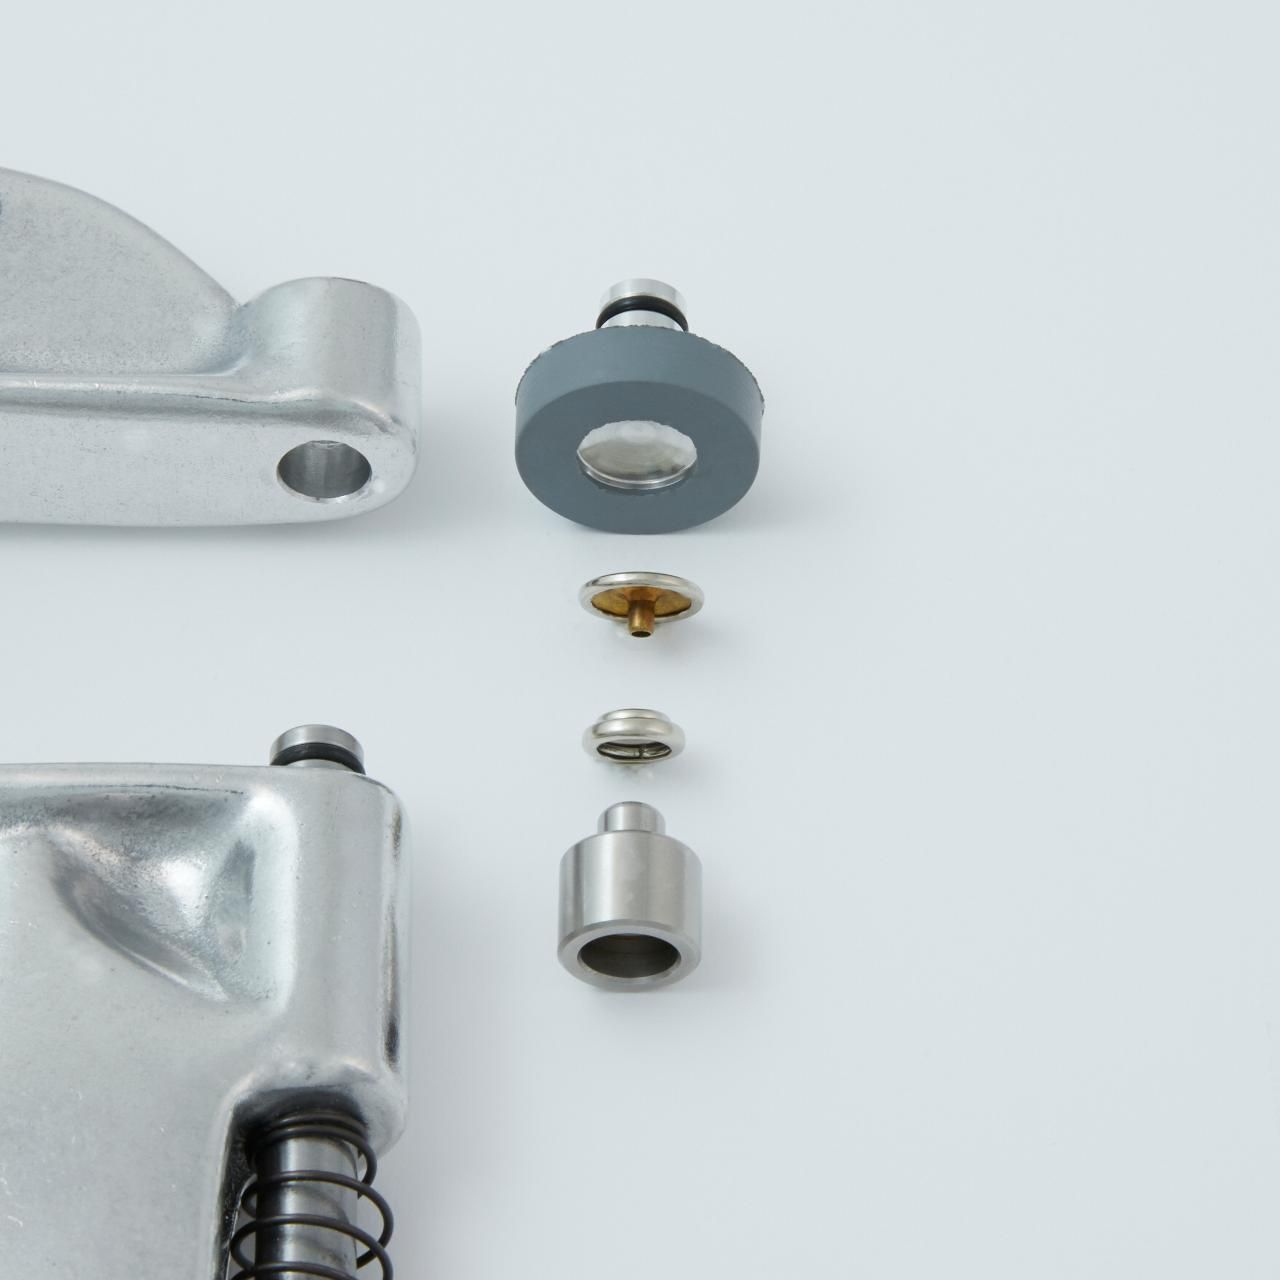
E) Installing Standard Grommet Fasteners with Plain or Spur Washers
Cut/pierce a hole with a Pres-N-Snap Hole Punch or a cutter of your choice in a piece of scrap fabric folded to the same thickness/layers as your project. Be sure to cut the correct size hole for your grommet size.
Next, place your grommet fastener through the hole in your fabric.
Then, place the washer fastener, curved side down, onto the lower rolling die on the plunger/shaft. The washer should nest nicely onto the die. Caution: Do not place the grommet with the barrel shape onto the lower plunger rolling die. This is backwards from the correct way of using the dies and doing so will destroy your fasteners and potentially damage your dies. Caution: If your fasteners are too loose, your fasteners may tear out over time. Over tightening may cause distortion to the fasteners and can damage the dies.
Hold the grommet fastener that has been placed through the hole in your fabric in position on the upper anvil die while carefully closing the handle of the tool. Once the grommet fastener is held in place with tension from the tool, you no longer need to hold the fastener in place. Continue pressing/closing the handle until all the way closed. When properly installed, the fasteners should not rotate when set in fabric.
If your fasteners are loose: Turn the adjusting end bolt clockwise to tighten. Carefully press/close the handle being certain that the fasteners are properly aligned with the dies.
If your fasteners are too tight: Turn the adjusting end bolt counterclockwise.
You are now ready to install your fasteners on your project.
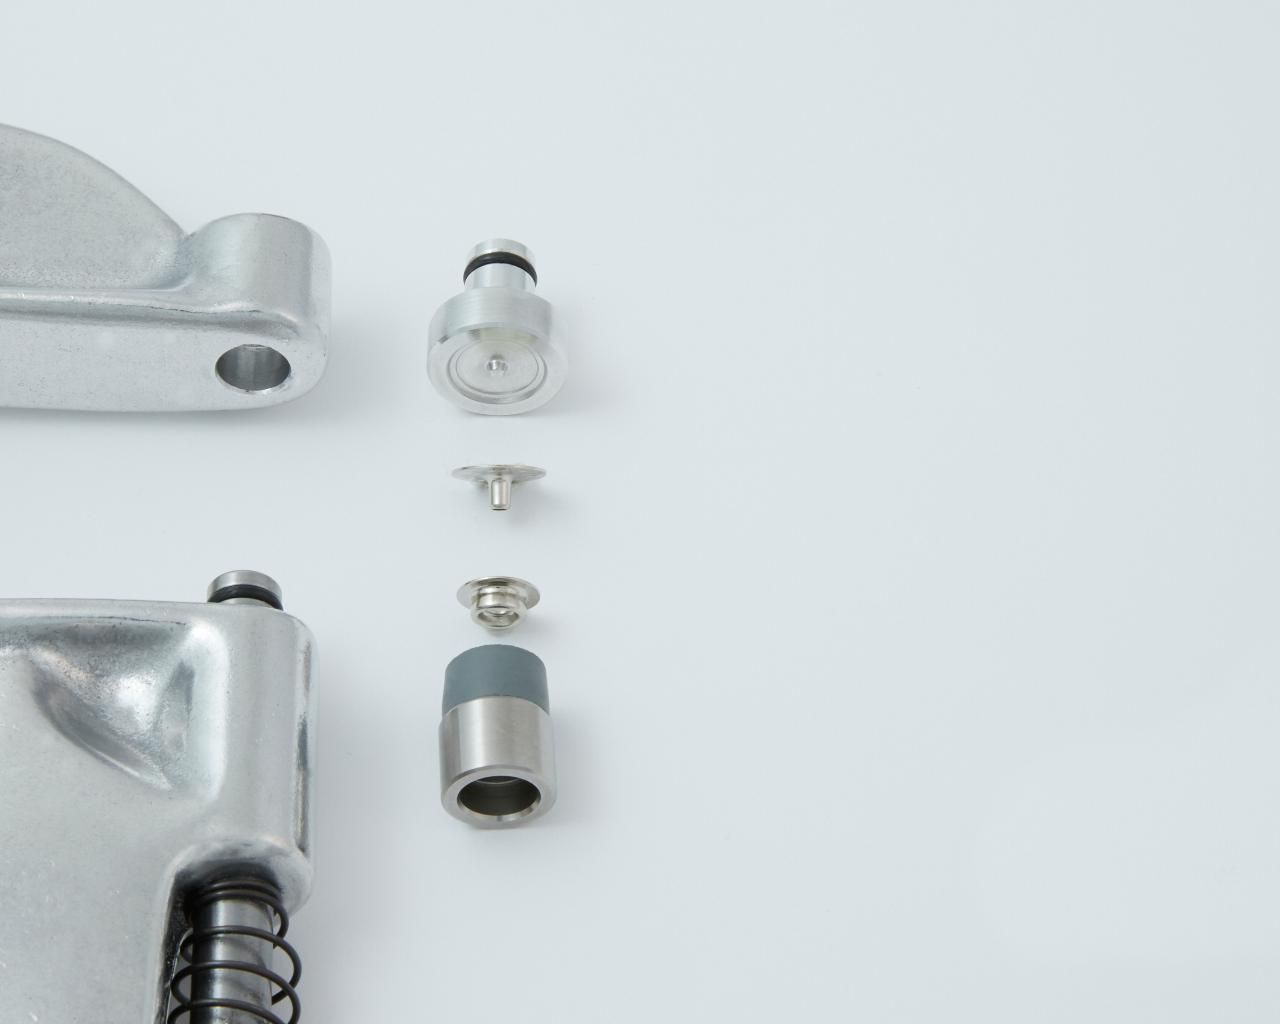
F) Installing Self-Piercing Grommet Fasteners
Place your grommet washer into the upper rolling die with the tiny teeth pointing down towards the bottom of the tool.
Next, place the grommet fastener onto the lower anvil die on the plunger/shaft. The grommet fastener should nest nicely onto the die. Caution: Do not place the grommet with the barrel shape onto the upper rolling die. This is backwards from the correct way of using the dies and doing so will destroy your fasteners and potentially damage your dies.
Adjust the tightness of the fasteners using a piece of scrap fabric folded to the same thickness/layers as your project. Caution: If your fasteners are too loose, your fasteners may tear out over time. Over tightening may cause distortion to the fasteners and can damage the dies. Place your fabric between the dies and press/close the handle of the tool all the way.
If your fasteners are loose: Turn the adjusting end bolt clockwise to tighten. Carefully press/close the handle being certain that the fasteners are properly aligned with the dies.
If your fasteners are too tight: Turn the adjusting end bolt counterclockwise.
You are now ready to install your fasteners on your project.
G) Installing Spring Snap Fasteners
For button/cap and socket spring snap fasteners:
Snap your socket fastener onto the socket die.
Next, place your button/cap fastener into the button/cap die. The button/cap die has a concave, inward curve to it. The decorative domed button/cap side should nest nicely into the die. A gray rubber retainer on the die will hold the fastener in place during the installation process.
For eyelet/post and stud spring snap fasteners:
Place your eyelet/post fastener into the eyelet/post die. The eyelet/post die has a mostly flat surface to it. The flat part of the eyelet/post fastener should nest nicely into the die. A gray rubber retainer on the die will hold the fastener in place during the installation process.
Next, place your stud fastener into the stud die.
Adjust the tightness of the fasteners using a piece of scrap fabric folded to the same thickness/layers as your project. Caution: If your fasteners are too loose, your fasteners may tear out over time. Over tightening may cause distortion to the fasteners and can damage the dies. Place the fabric between the dies and press/close the handle of the tool until all the way closed. When properly installed, the fasteners should not rotate when set in fabric.
If your fasteners are loose: Turn the adjusting end bolt clockwise to tighten. Leaving the die in place, remove the gray rubber retainer from the upper die to prevent damaging it. Then carefully press/close the handle being certain that the fasteners are properly aligned with the dies. Once satisfied with how tight the fasteners are, reinstall the gray rubber retainer.
If your fasteners are too tight: Turn the adjusting end bolt counterclockwise.
You are now ready to install your fasteners on your project.
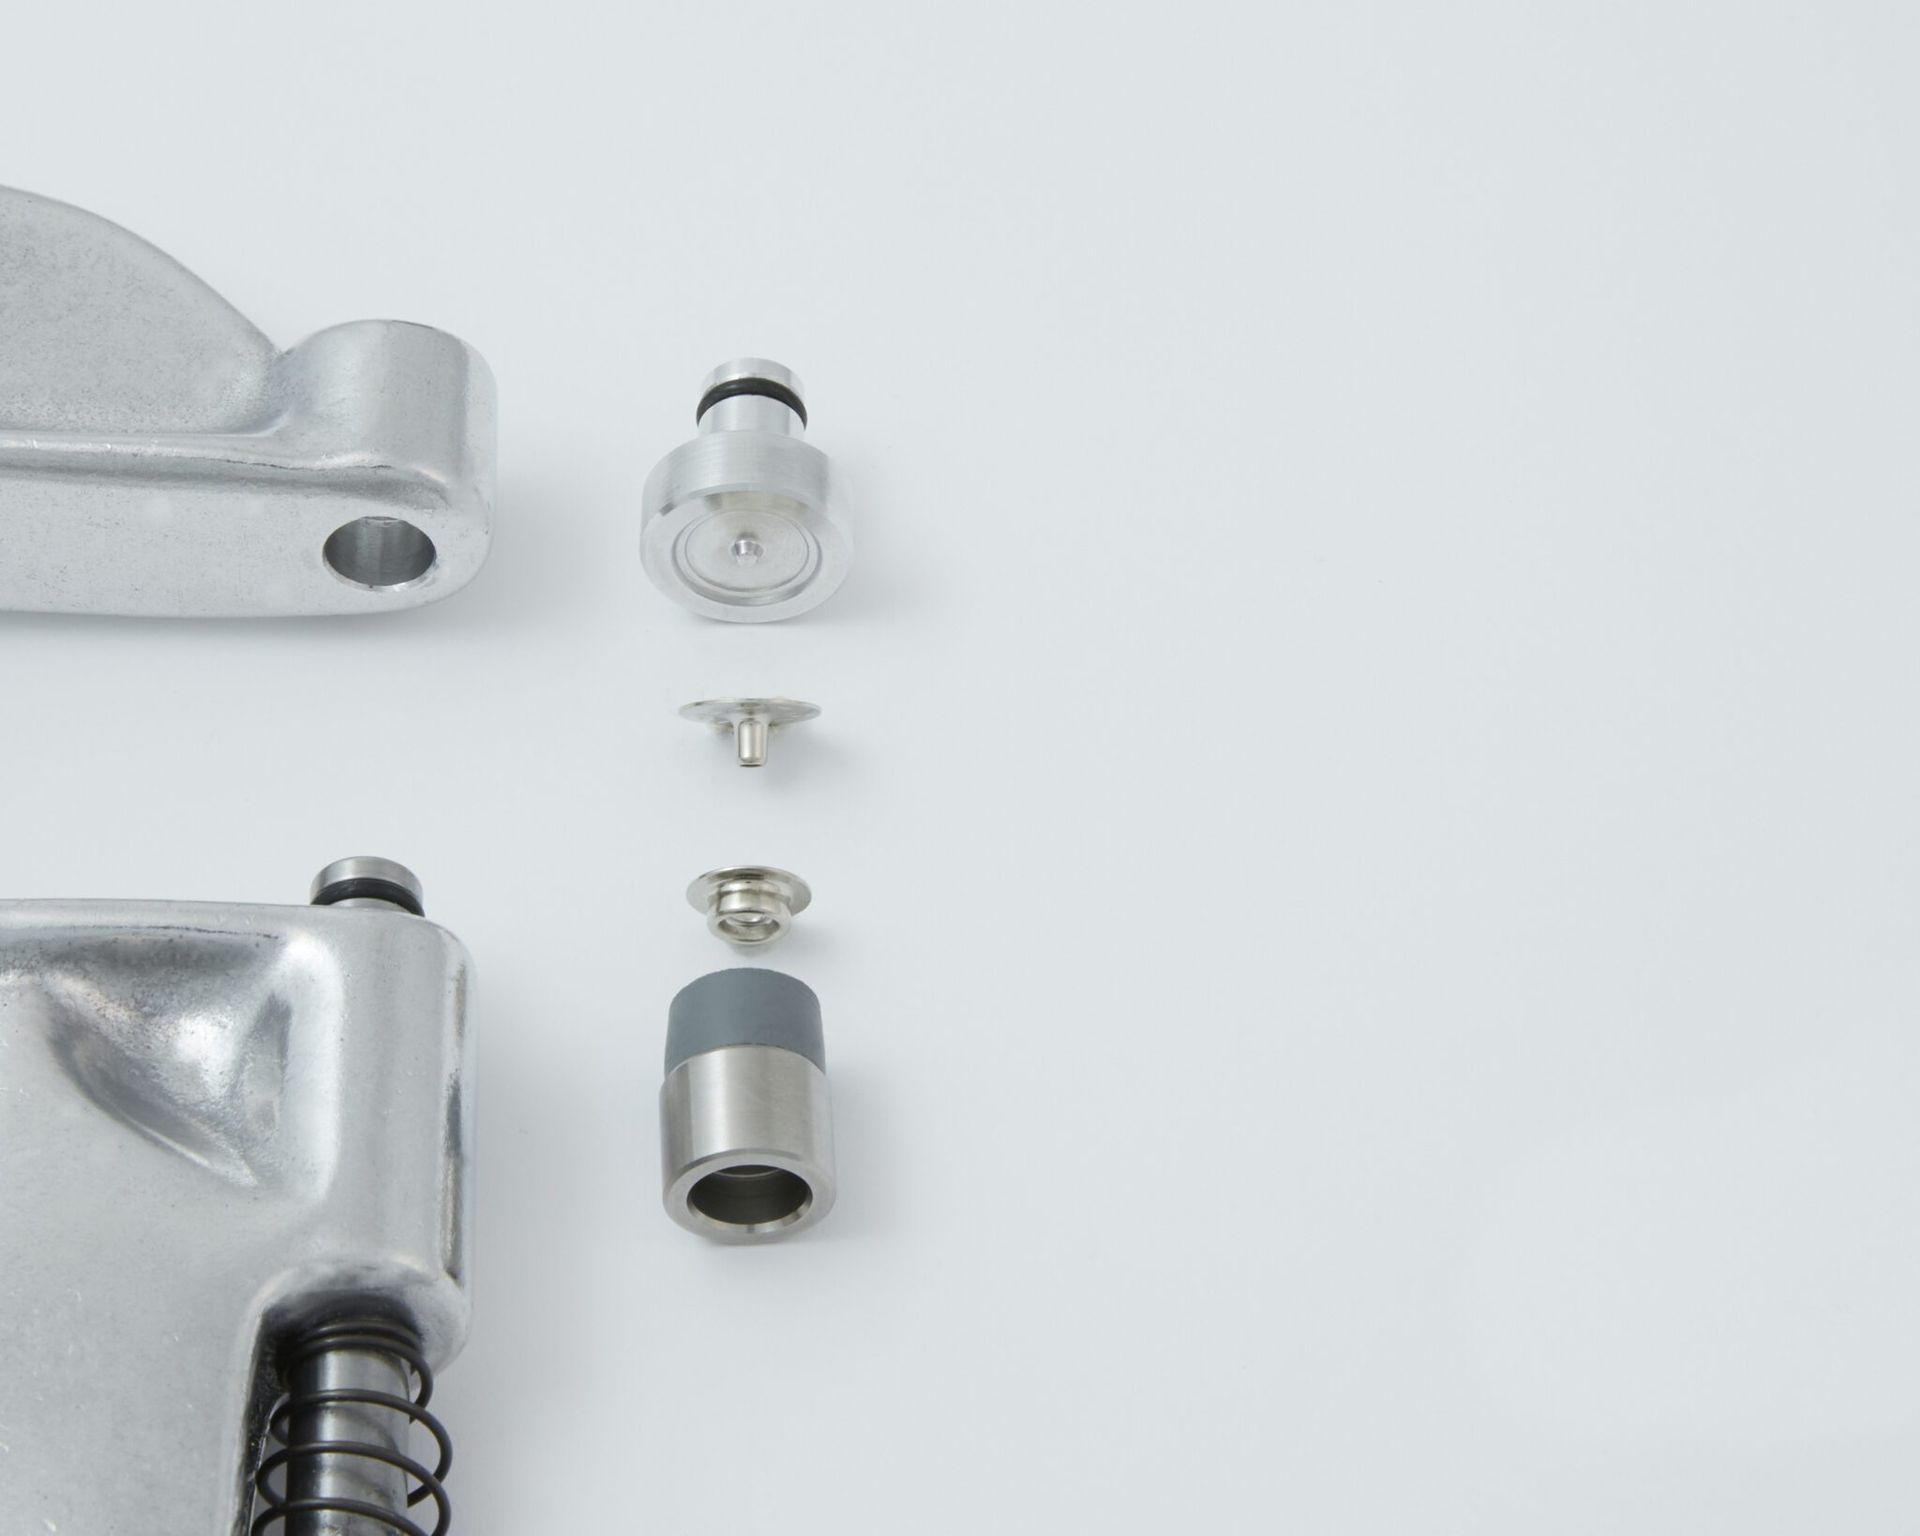
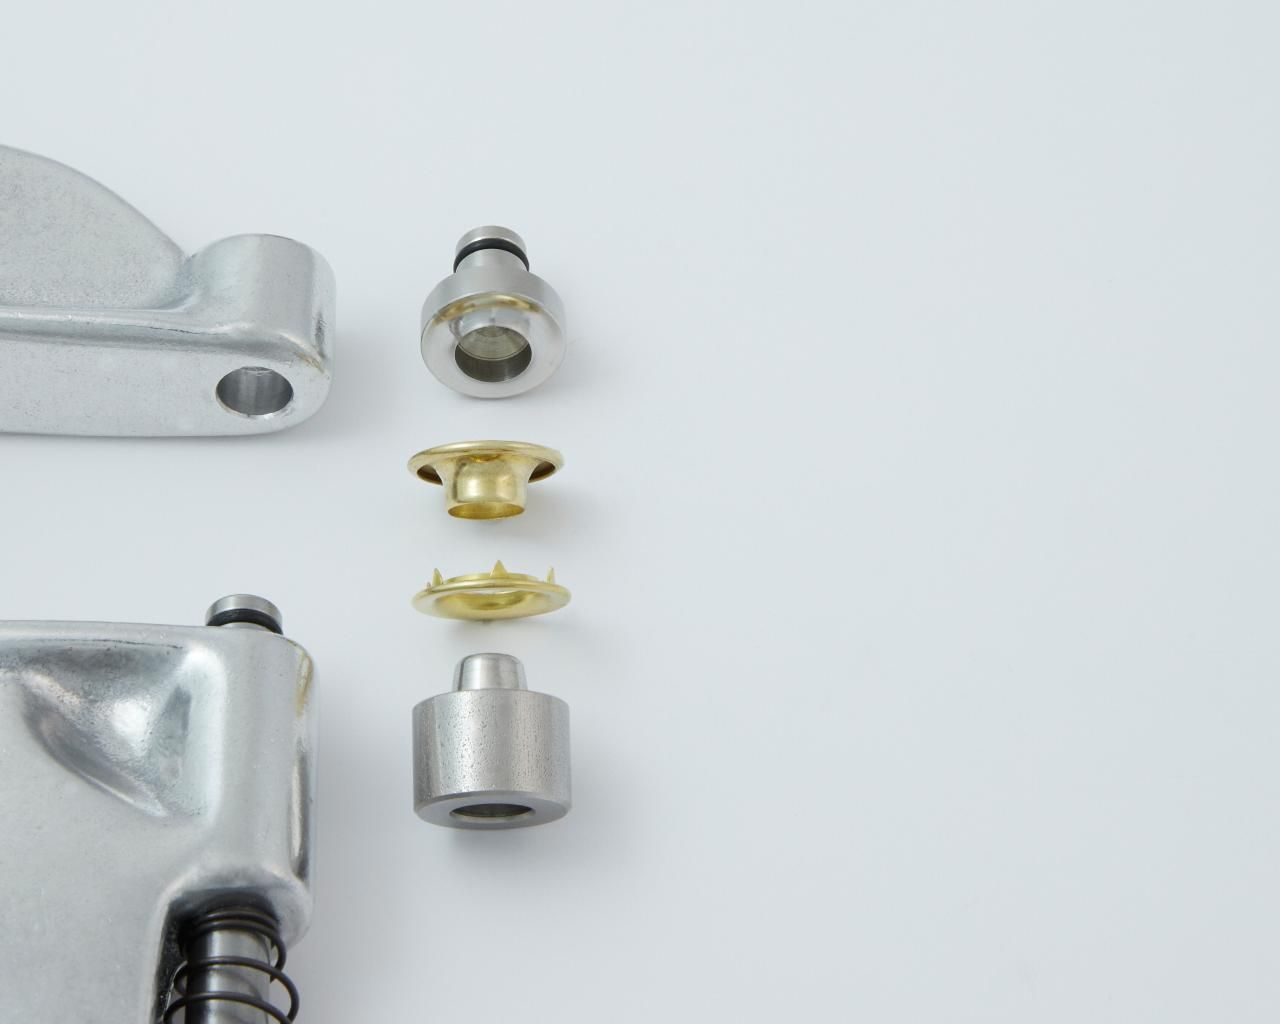
H) Installing Pearl and Prong Western Type Fasteners
For pearl button cap and socket snap fasteners:
Snap your socket fastener onto the socket die.
Next, place your pearl fastener into the button/cap die. The button/cap die has a concave, inward curve to it. The decorative pearl button should nest nicely into the die.
For prong/post and stud snap fasteners:
Place your stud fastener into the stud die. A clear cylinder will hold your stud in place.
Place your prong/ring fastener into the ring die. The flat part of the ring fastener should nest nicely into the die.
Adjust the tightness of the fasteners using a piece of scrap fabric folded to the same thickness/layers as your project. Caution: If your fasteners are too loose, your fasteners may tear out over time. Over tightening may cause damage to the fasteners, especially the pearl button! Damage may also occur to the dies. Place the fabric between the dies and press/close the handle of the tool until all the way closed.
If your fasteners are loose: Turn the adjusting end bolt clockwise to tighten. Carefully press/close the handle being certain that the fasteners are properly aligned with the dies.
If your fasteners are too tight: Turn the adjusting end bolt counterclockwise.
You are now ready to install your fasteners on your project.
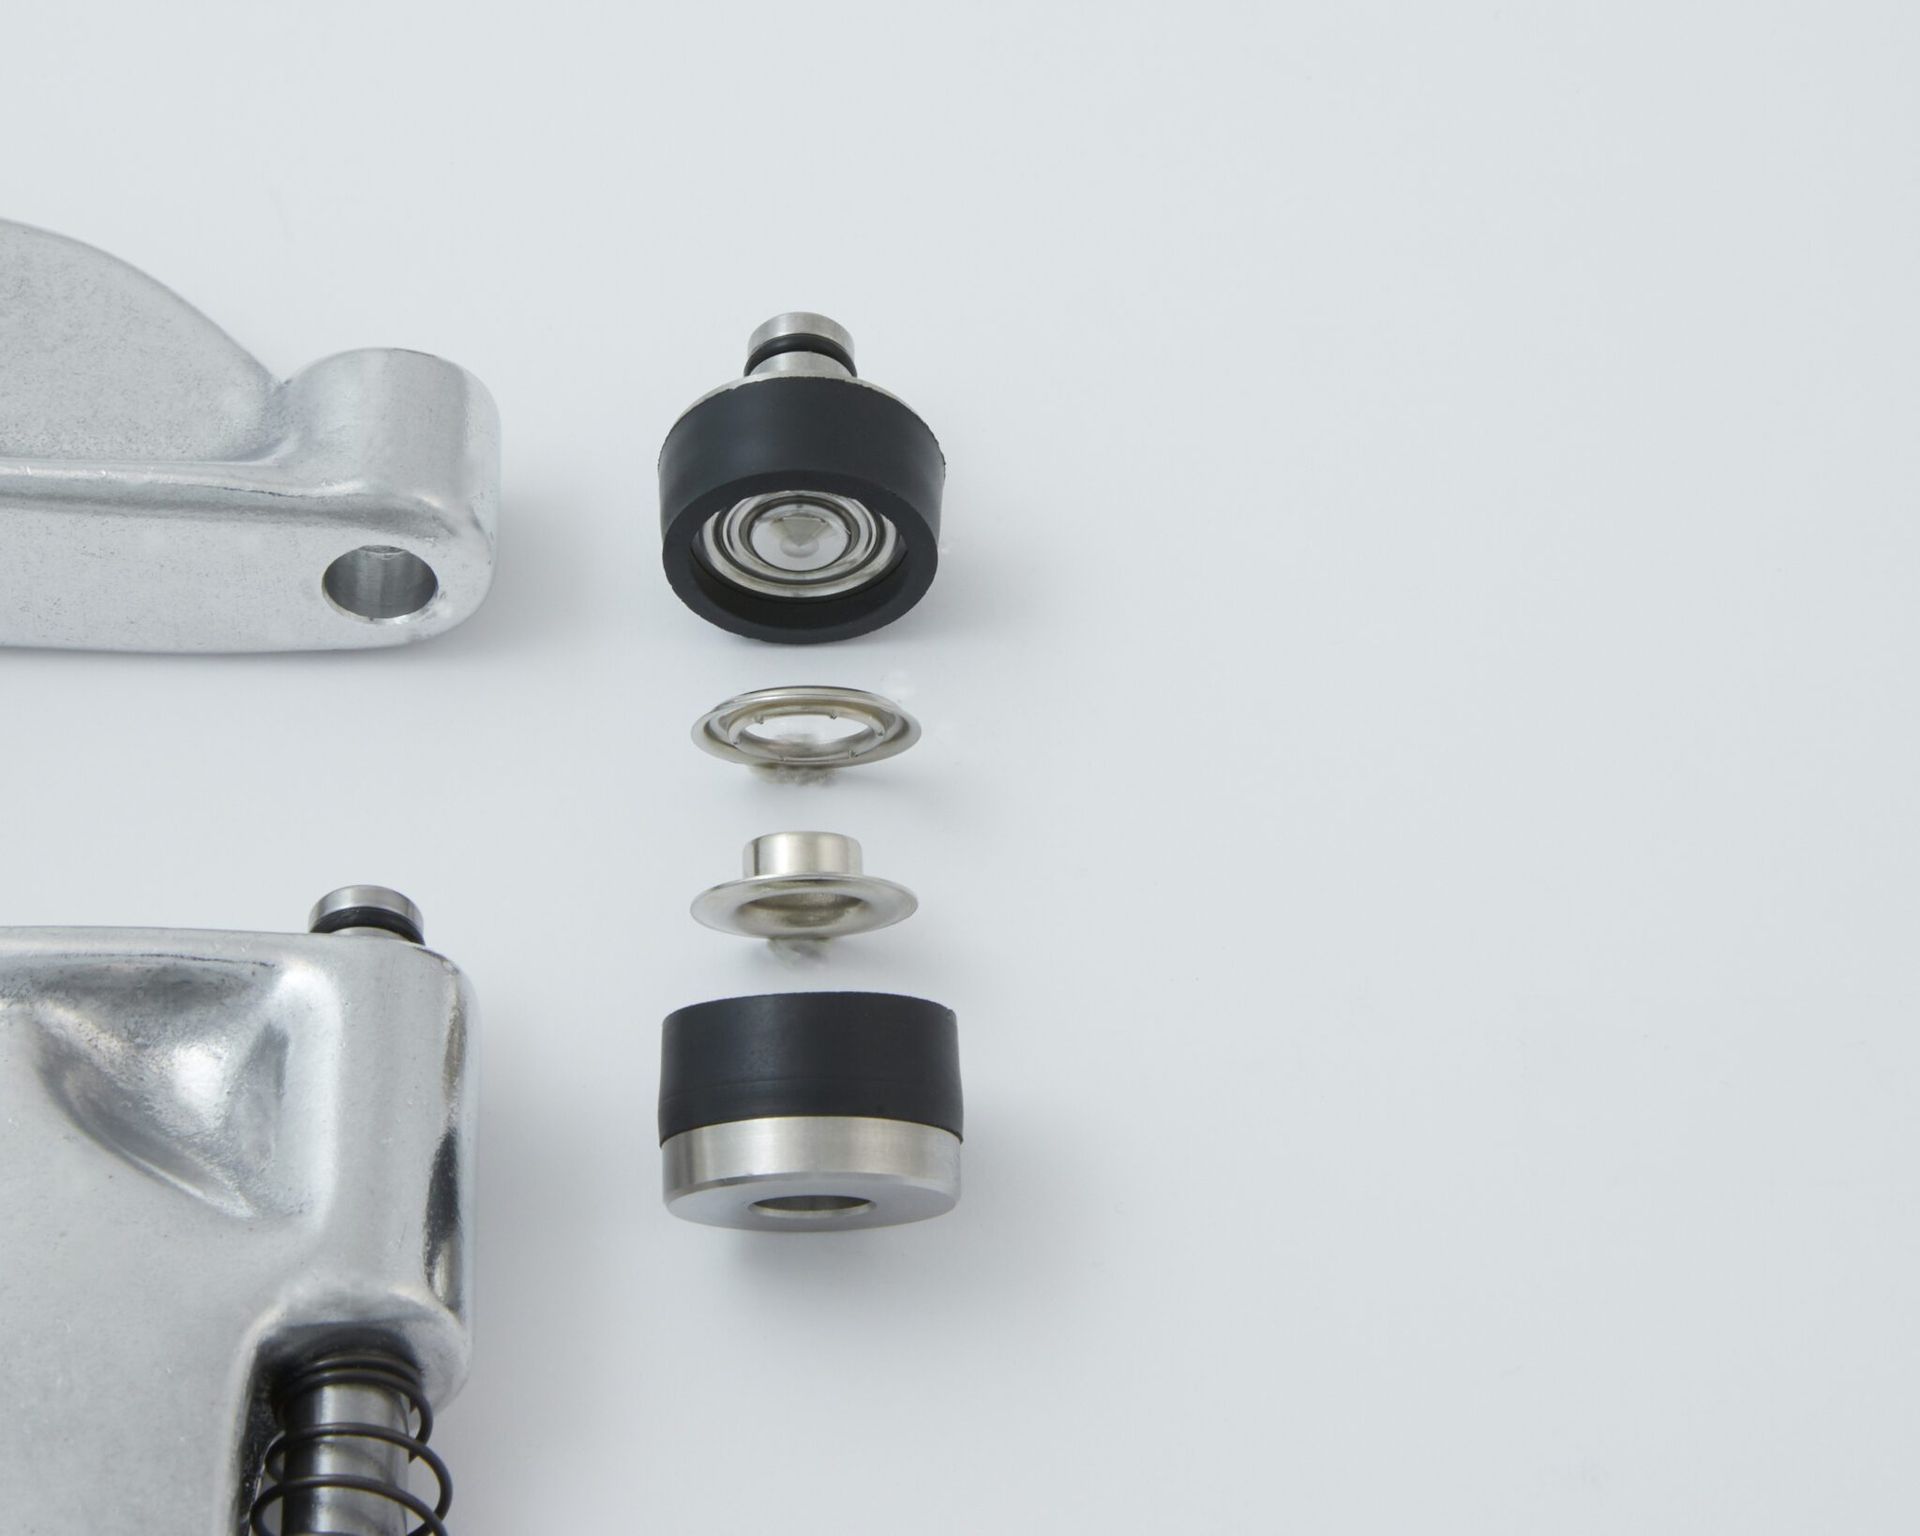
I) Installing Morito Scovill DOT Lift-the-DOT fastener
Place your washer fastener into the lower plunger/shaft die. It is held in place with a black rubber retainer.
Next, place your stud/post fastener into the upper die.
Adjust the tightness of the fasteners using a piece of scrap fabric folded to the same thickness/layers as your project. Caution: If your fasteners are too loose, your fasteners may tear out over time. Over tightening may cause distortion to the fasteners and can damage the dies. Place the fabric between the dies and press/close the handle of the tool until all the way closed. When properly installed, the fasteners should not rotate in your fabric.
If your fasteners are loose: Turn the adjusting end bolt clockwise to tighten. Carefully press/close the handle being certain that the fasteners are properly aligned with the dies.
If your fasteners are too tight: Turn the adjusting end bolt counterclockwise.
You are now ready to install your fasteners on your project.
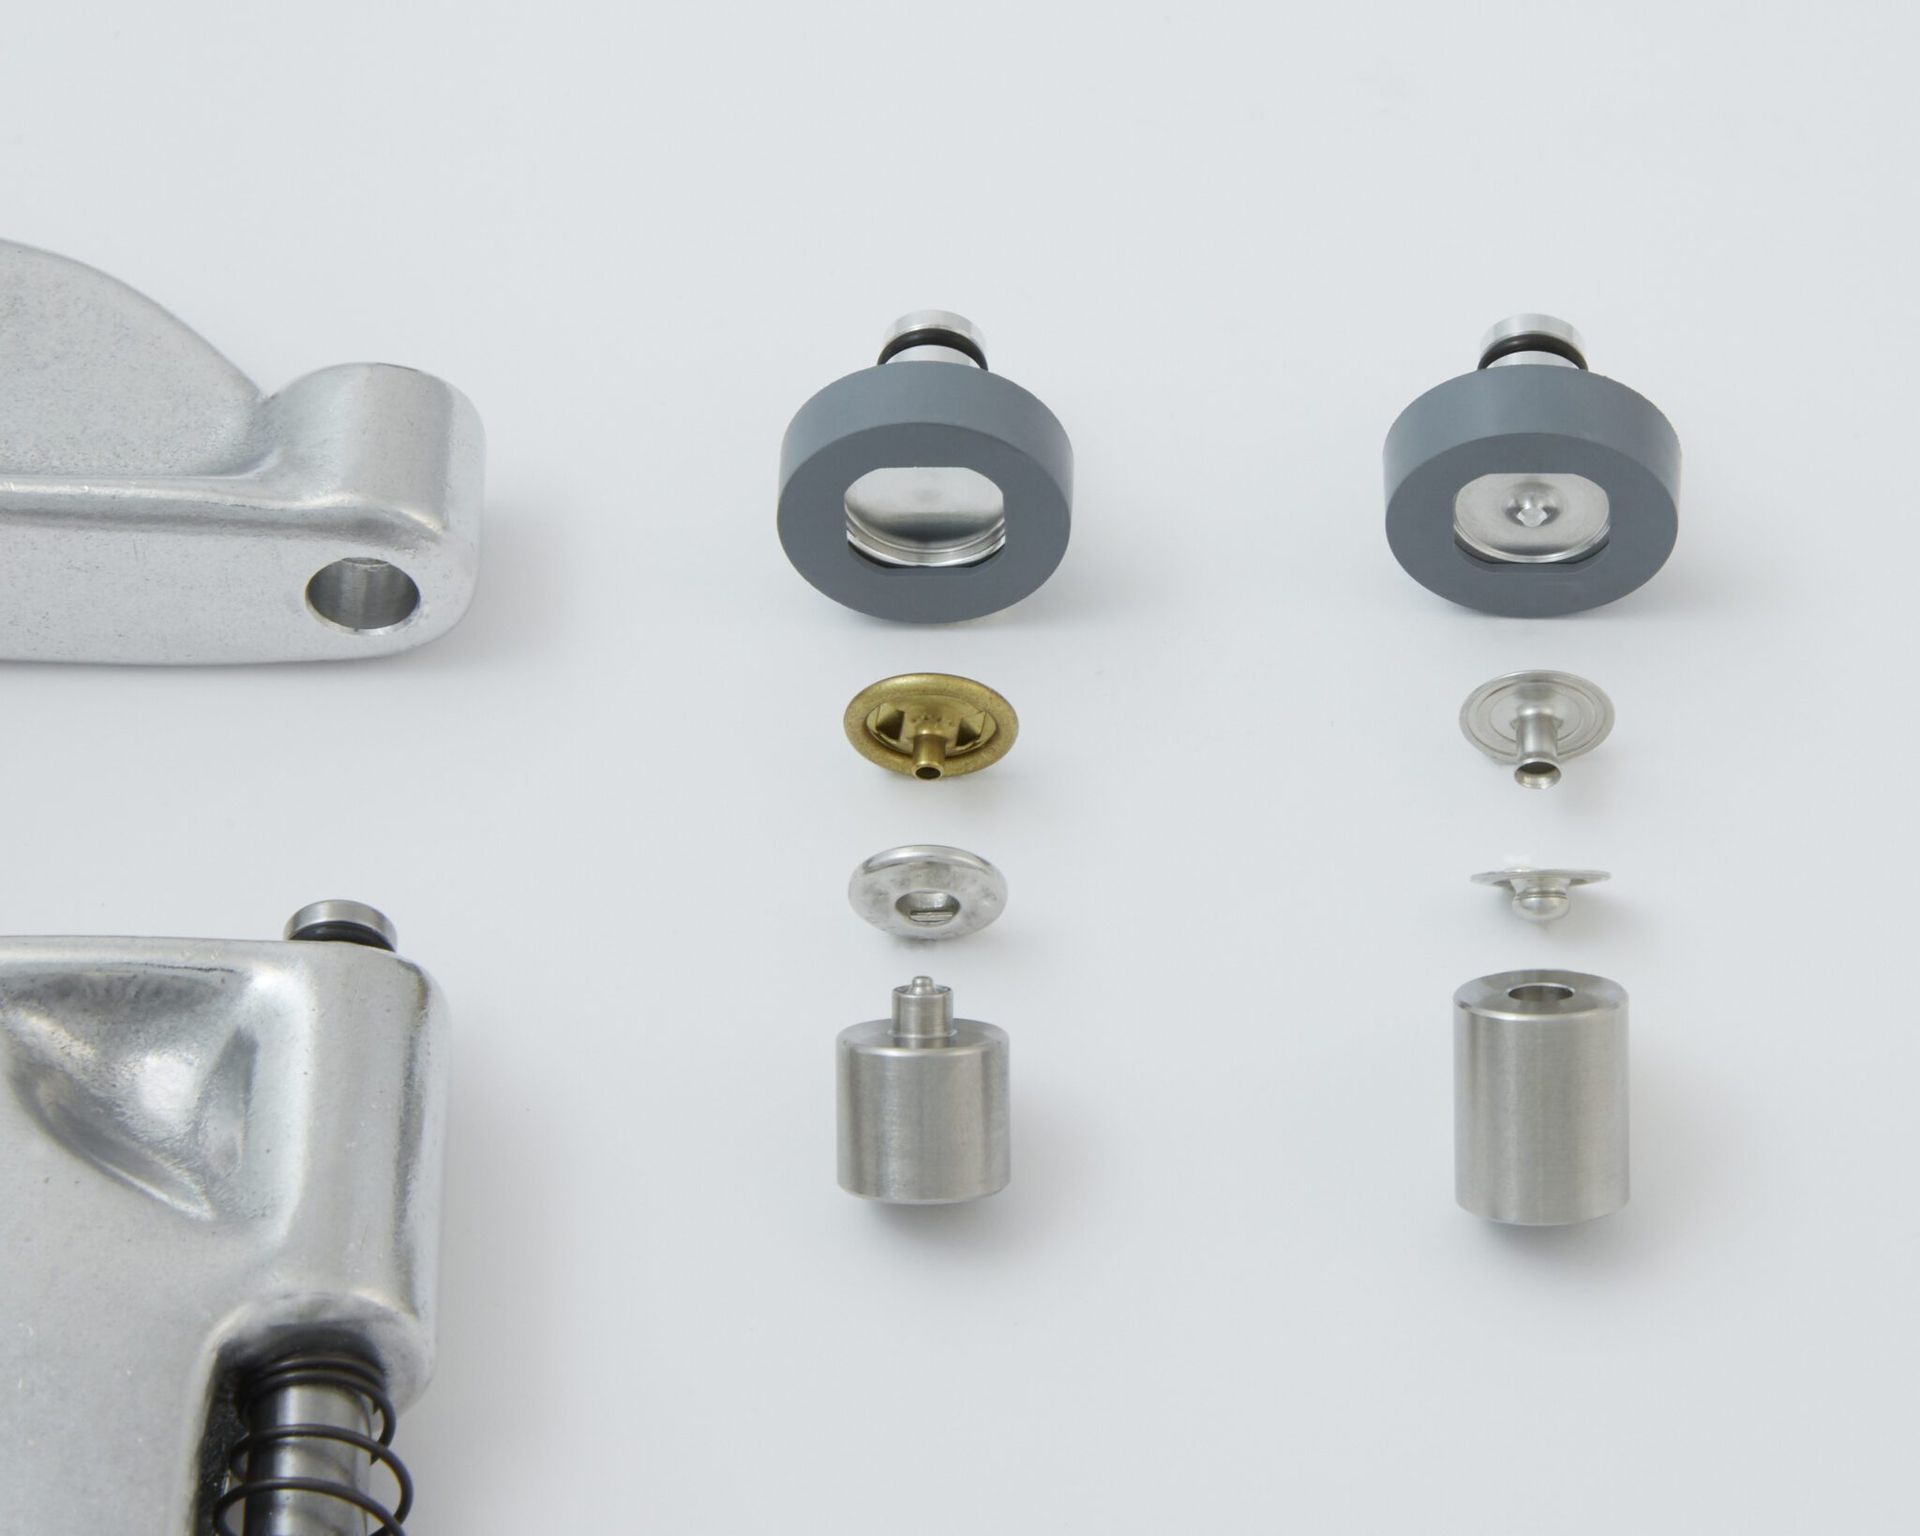
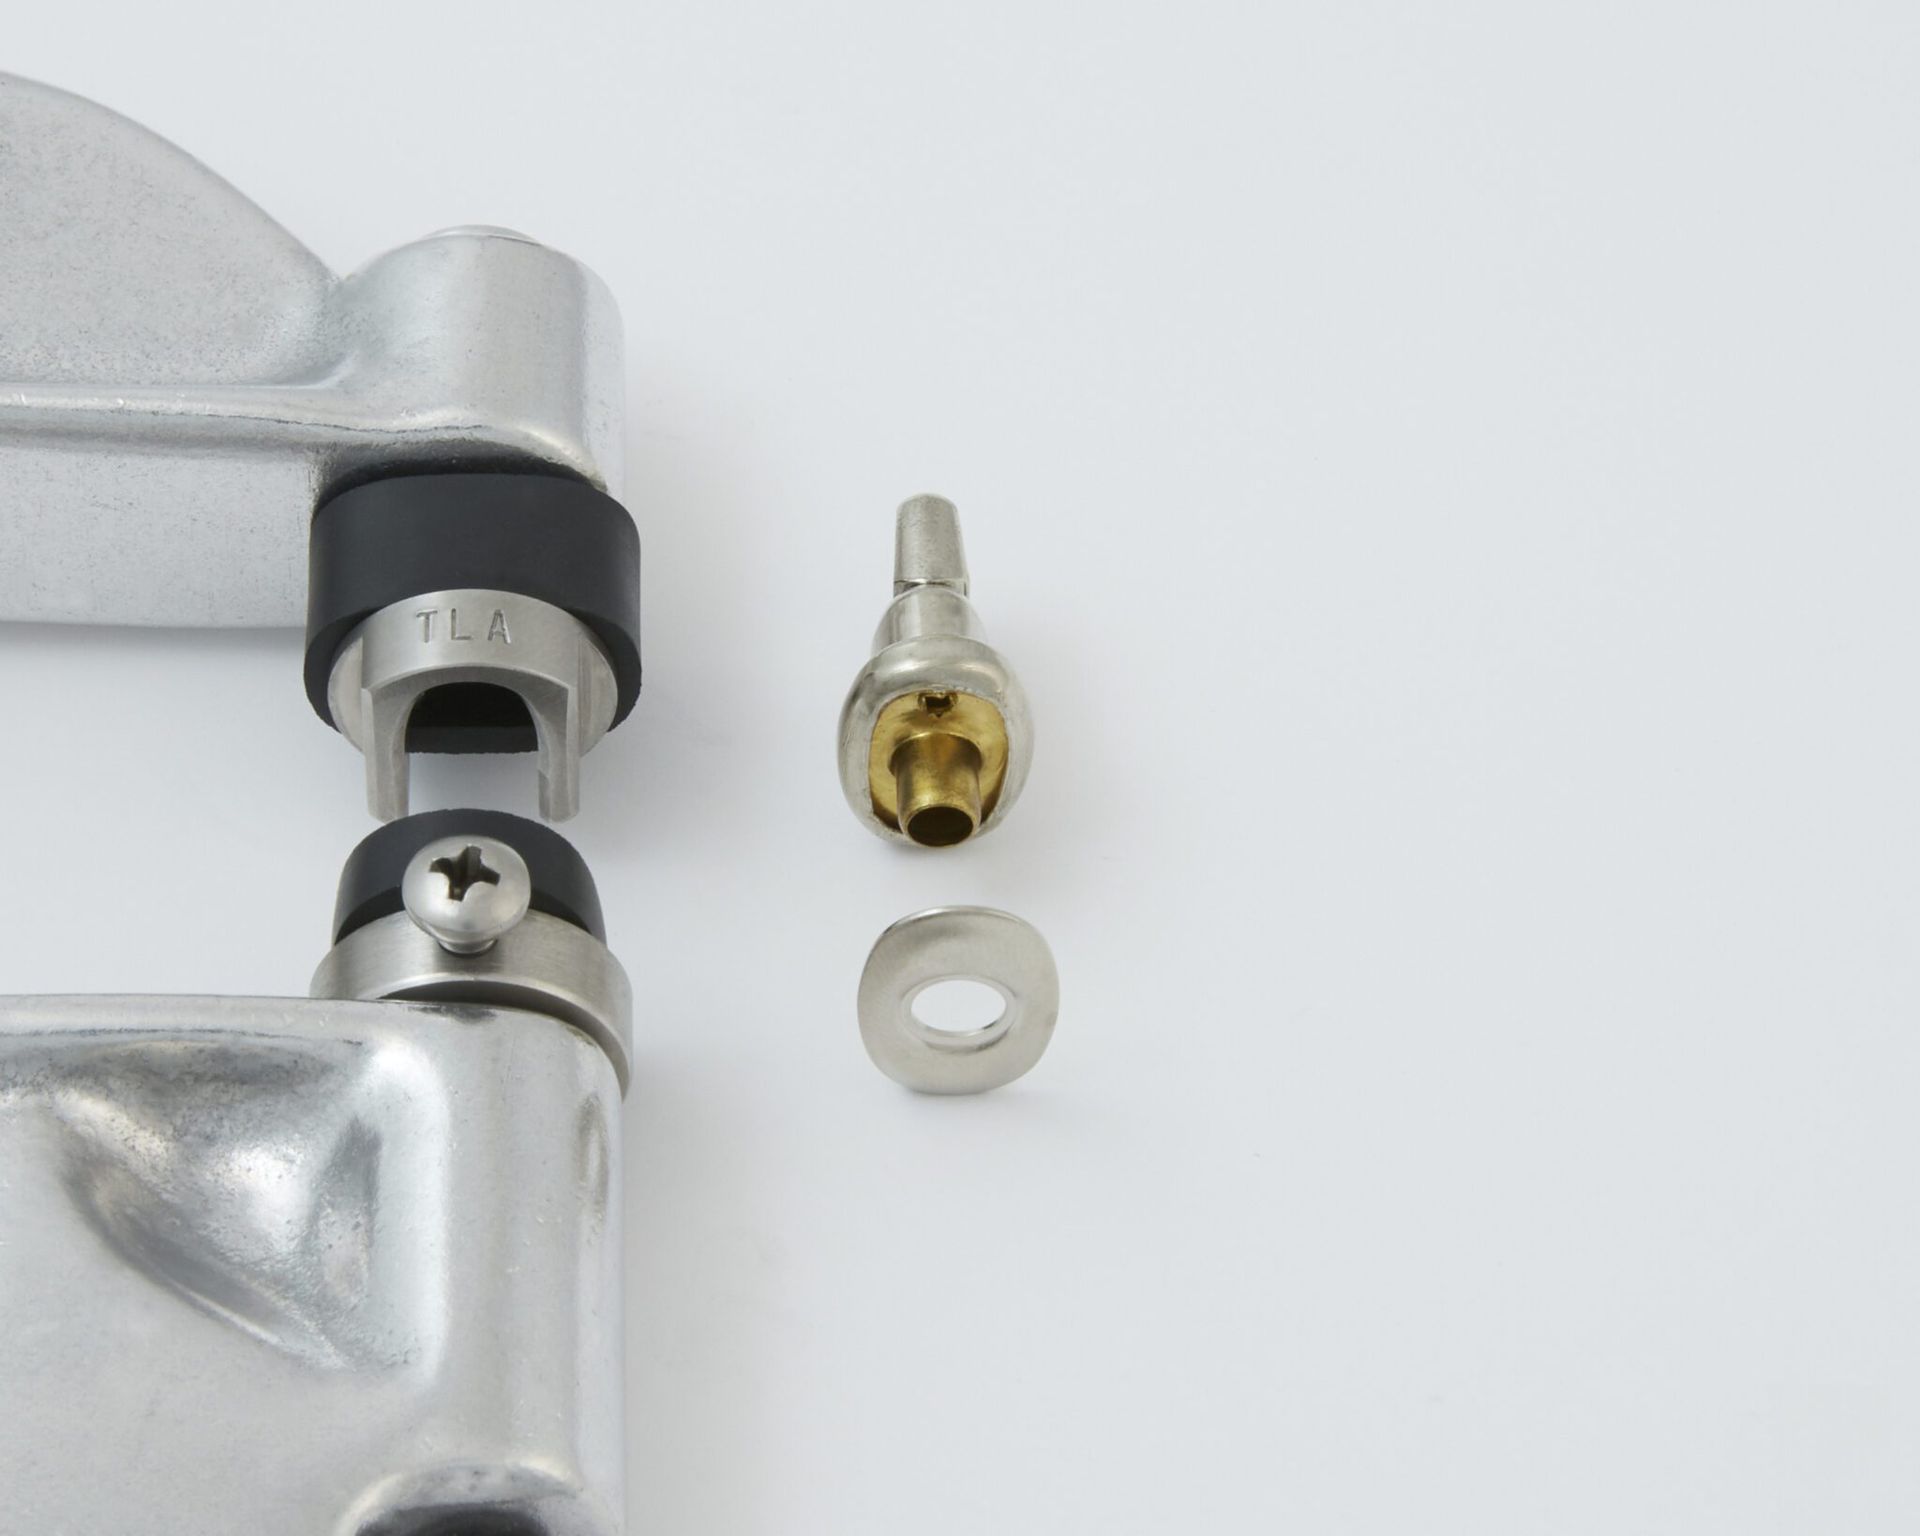
J) Installing Morito Scovill DOT Common Sense Turn Buttons
After having removed all other dies from the Pres-N-Snap, remove and set aside the small “o” ring on the plunger. Slightly close the handle of the tool to raise the plunger, then remove the small “o” ring. Using something like a dental pick or small nail may be helpful. Do not use a knife or anything sharp.
Now you can begin installing your Turn Lock Die Set:
- Remove the screw from the top of the TLA Die that is holding the tapered washer. Place the TLA Die into the upper hole of the Pres-N-Snap. Place the tapered washer over the very top of the Pres-N-Snap with the taper nesting into the top of the hole and secure with the screw. Be sure to align the TLA Die to your desired position prior to tightening the screw. Tighten the screw, being sure to not over tighten.
- Next, slightly press/close the handle of the tool, which raises the plunger/shaft. With the plunger/shaft slightly raised, install the TLR Die onto the plunger/shaft with no small “o” ring on it by sliding the die into place. You may have to loosen the set screw on the TLR Die first. Carefully close the handle of the Pres-N-Snap to bring the two dies close together. Then align the TLR Die to the TLA Die. Once aligned, tighten the set screw into the small “o” ring groove of the plunger/shaft. When properly installed, the die should not spin freely on the plunger/shaft. Take care to not over tighten the set screw.
- With the handle closed, turn the adjusting end bolt until the dies come in contact with each other. Then back-off 1/4 a turn. This will bring the tool closer to proper adjustment for the new die set.
Now you can begin installing your fasteners.

Place the washer, curved side down, into the TLR Die. It should nest nicely into the die and is held in place with a small black rubber retainer.
Next, place the turn button into the TLA Die. The turn button is held in place with a large black rubber retainer.
Adjust the tightness of the fasteners using a piece of scrap fabric folded to the same thickness/layers as your project. Caution: If your fasteners are too loose, your fasteners may tear out over time. Over tightening may cause distortion to the fasteners and can damage the dies. Place the fabric between the dies and press/close the handle of the tool until all the way closed.
If your fasteners are loose: Turn the adjusting end bolt clockwise to tighten. Carefully press/close the handle being certain that the fasteners are properly aligned with the dies.
If your fasteners are too tight: Turn the adjusting end bolt counterclockwise.
You are now ready to install your fasteners on your project.
To uninstall the die set after your project, follow the Turn Lock Die Set Installation instructions in reverse order.
Be sure to re-install the small “o” ring on the plunger/shaft.
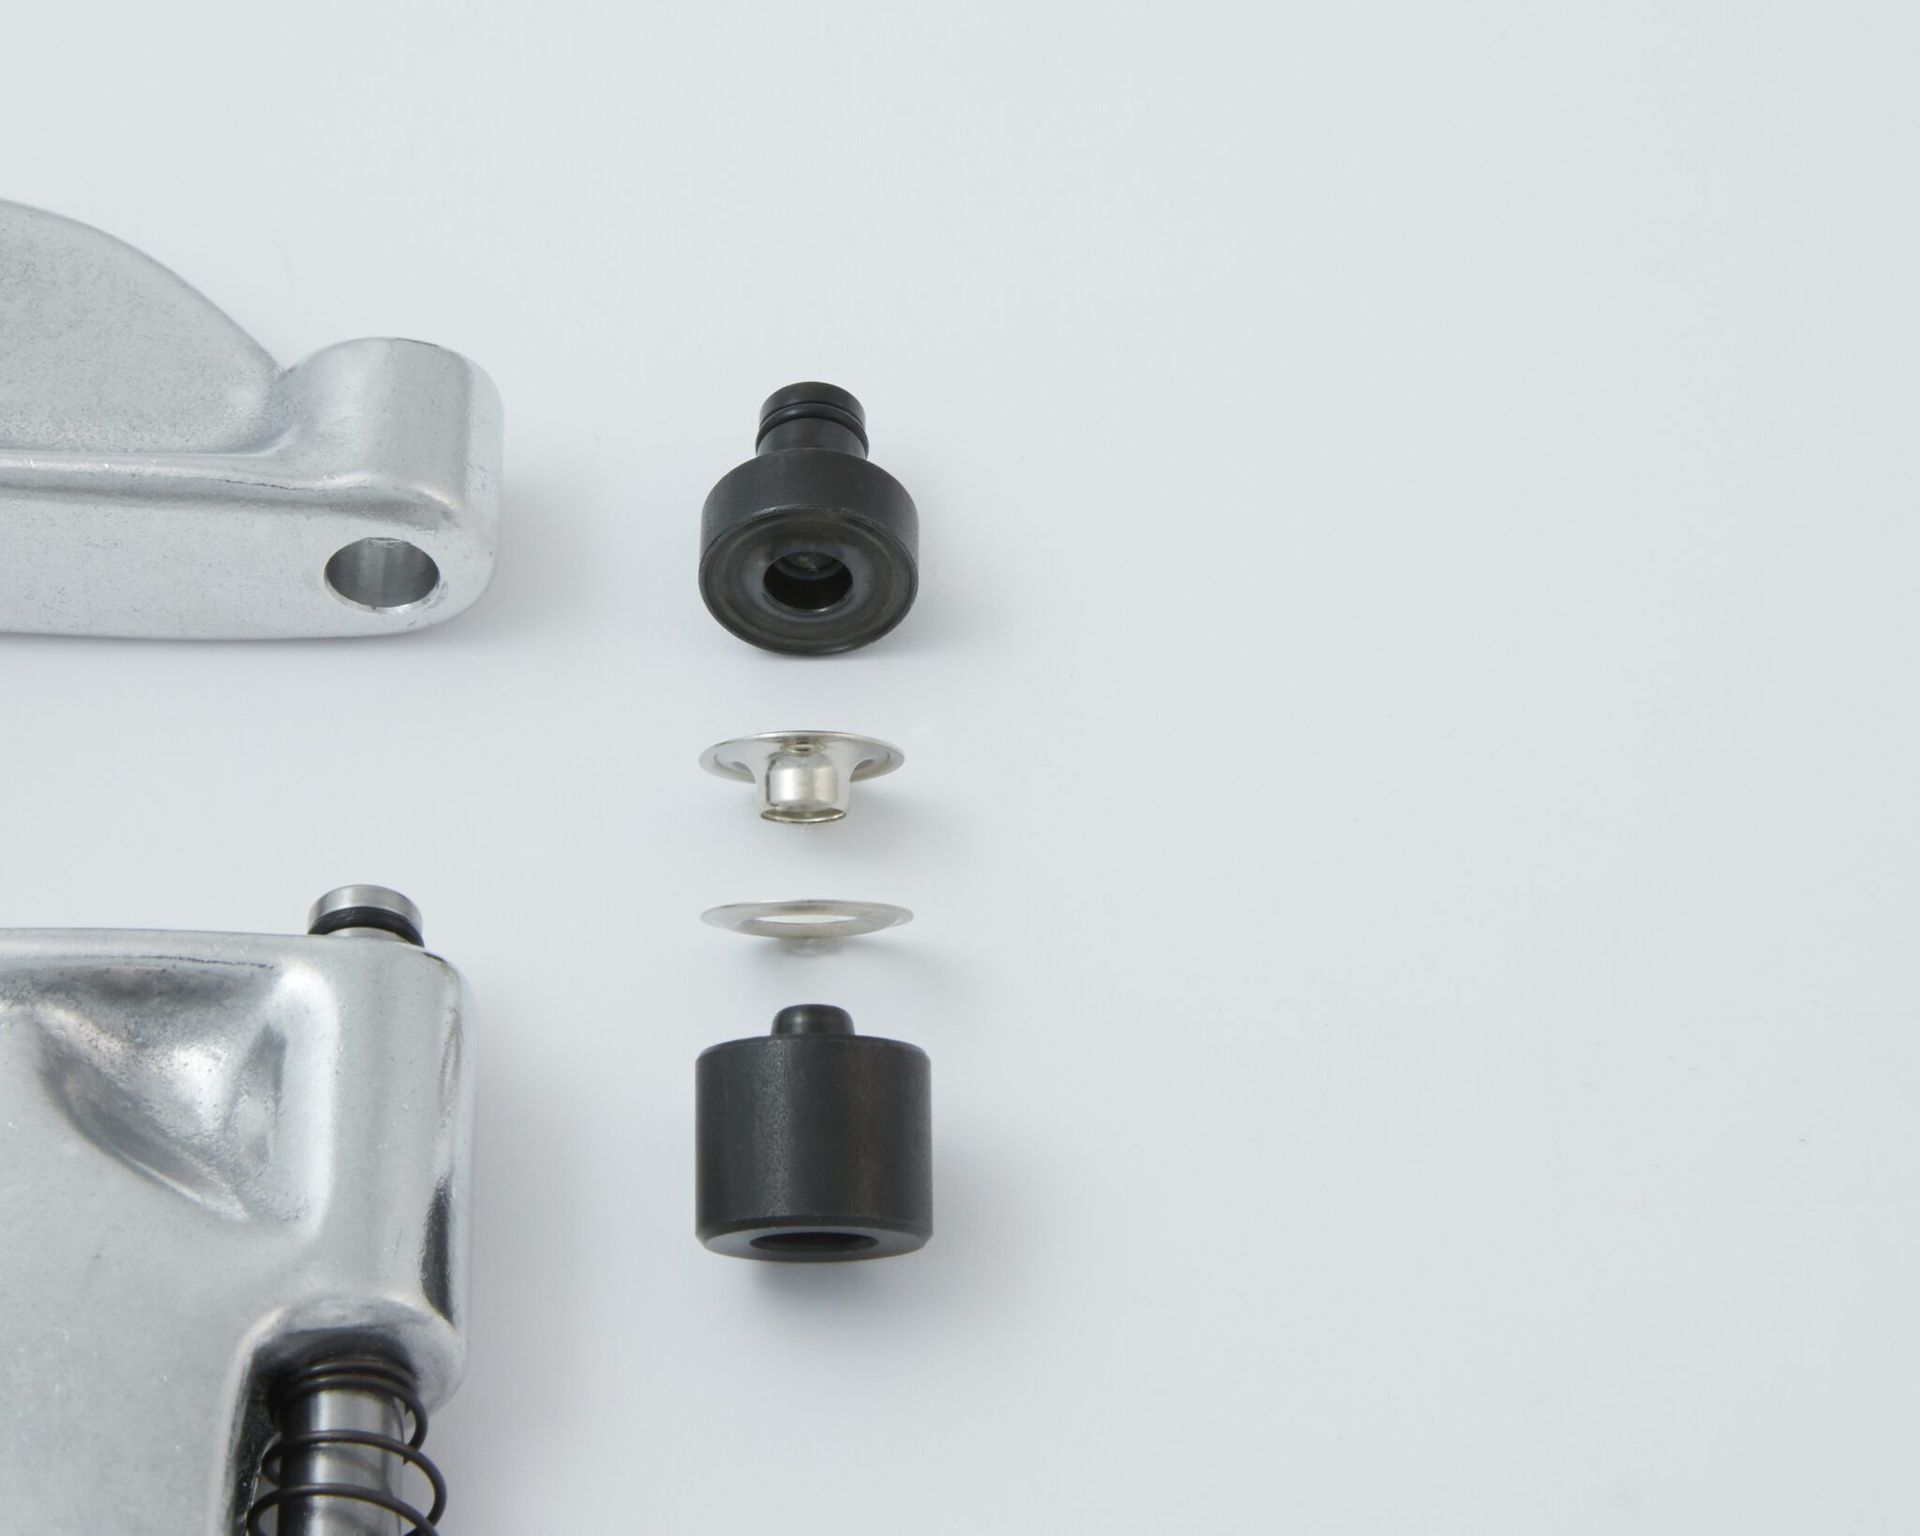
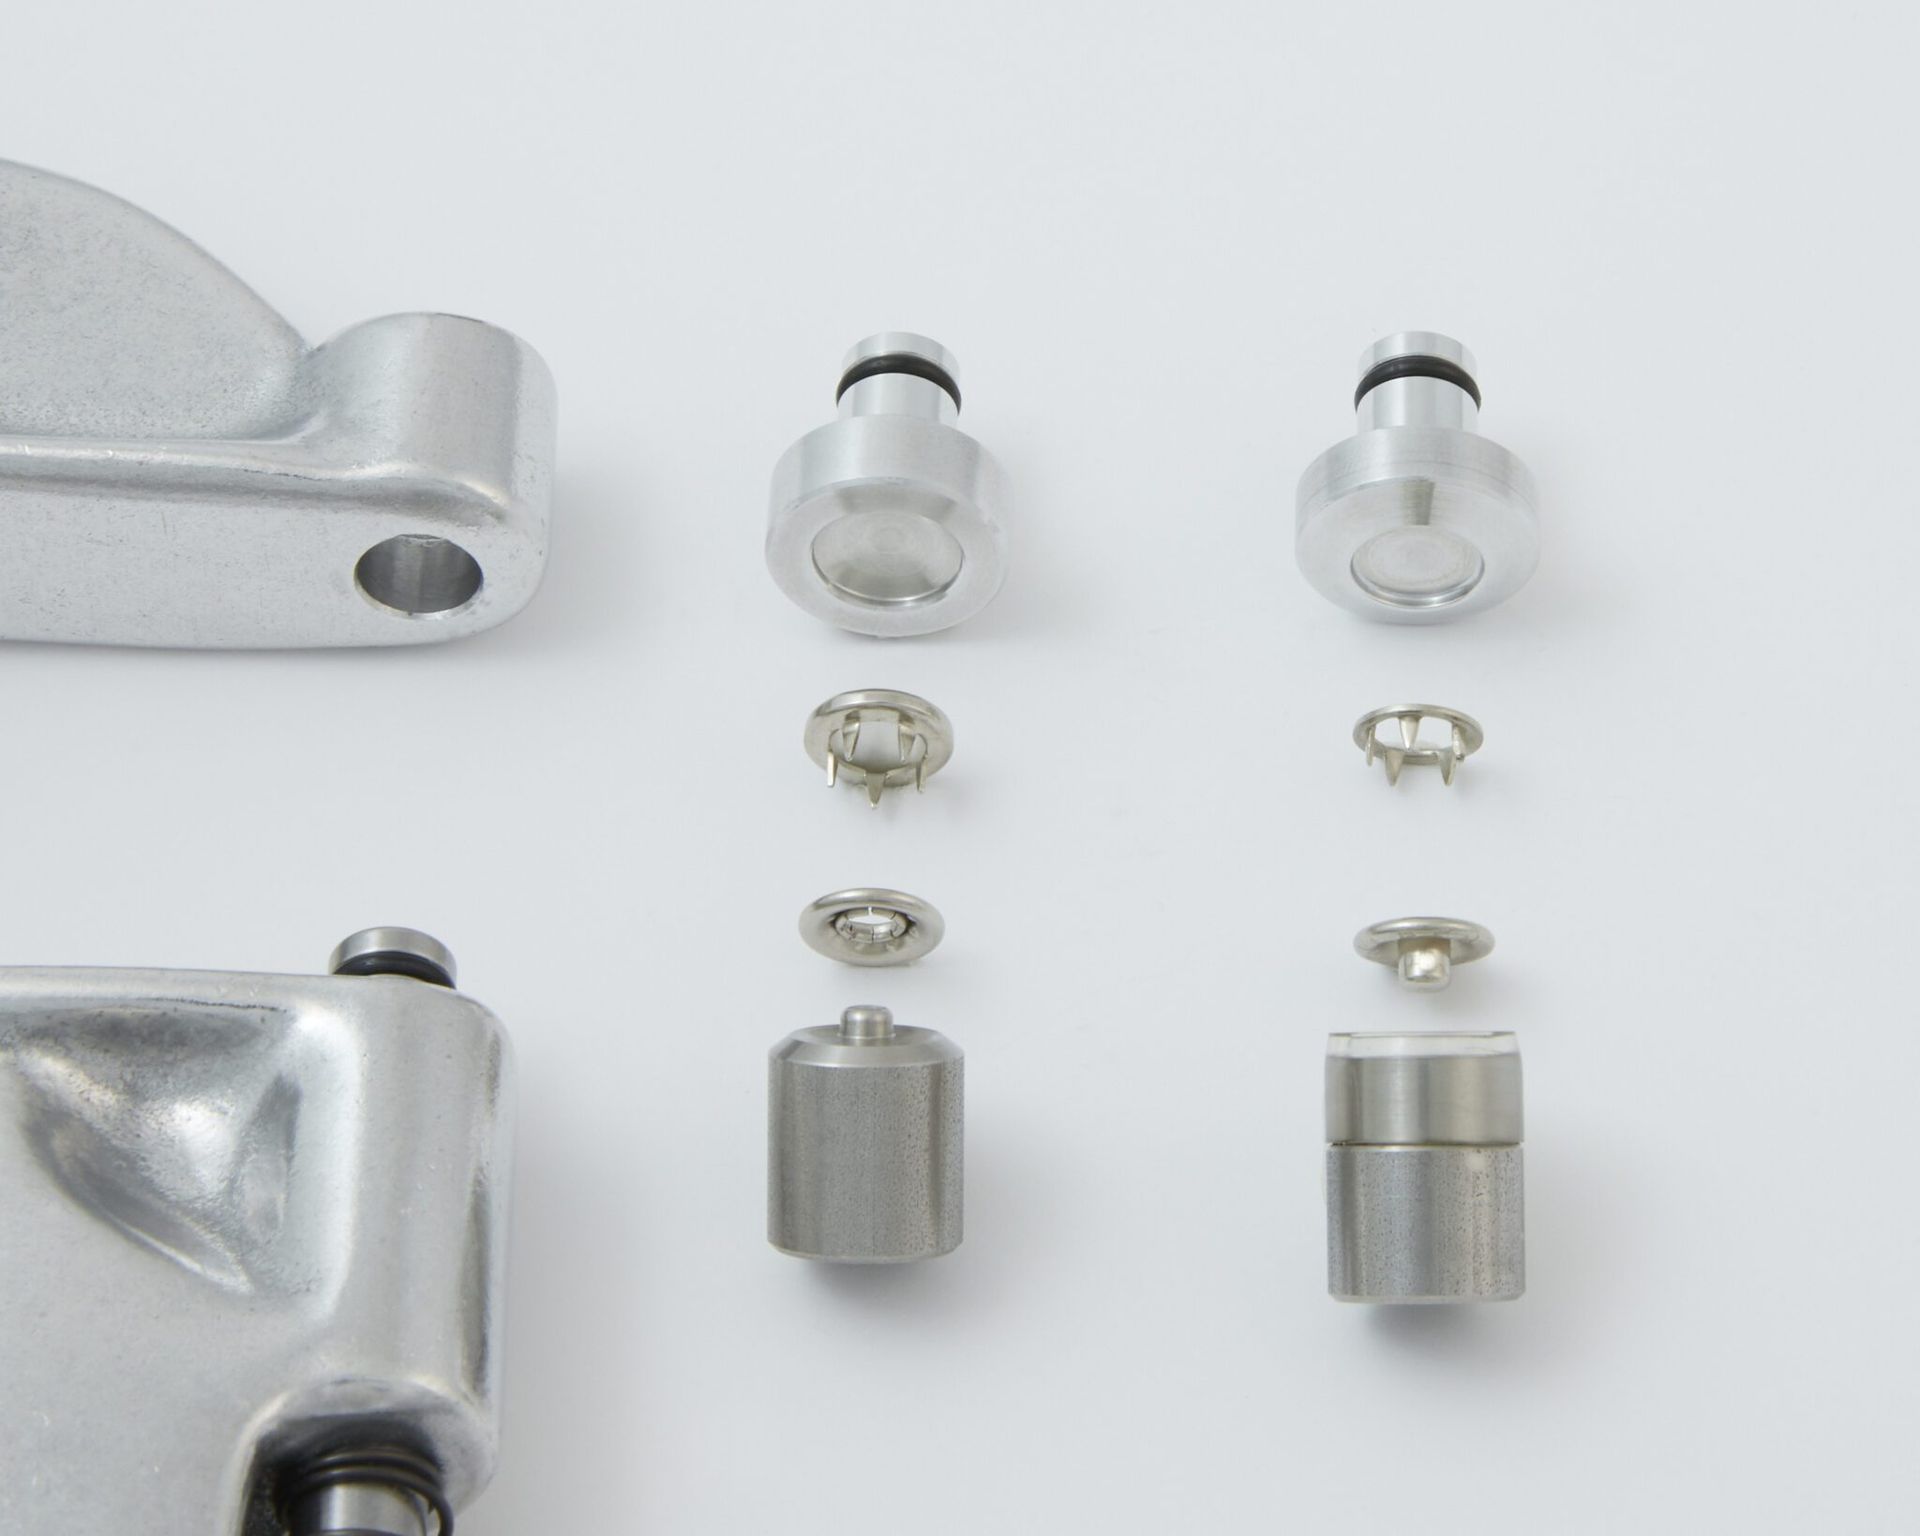
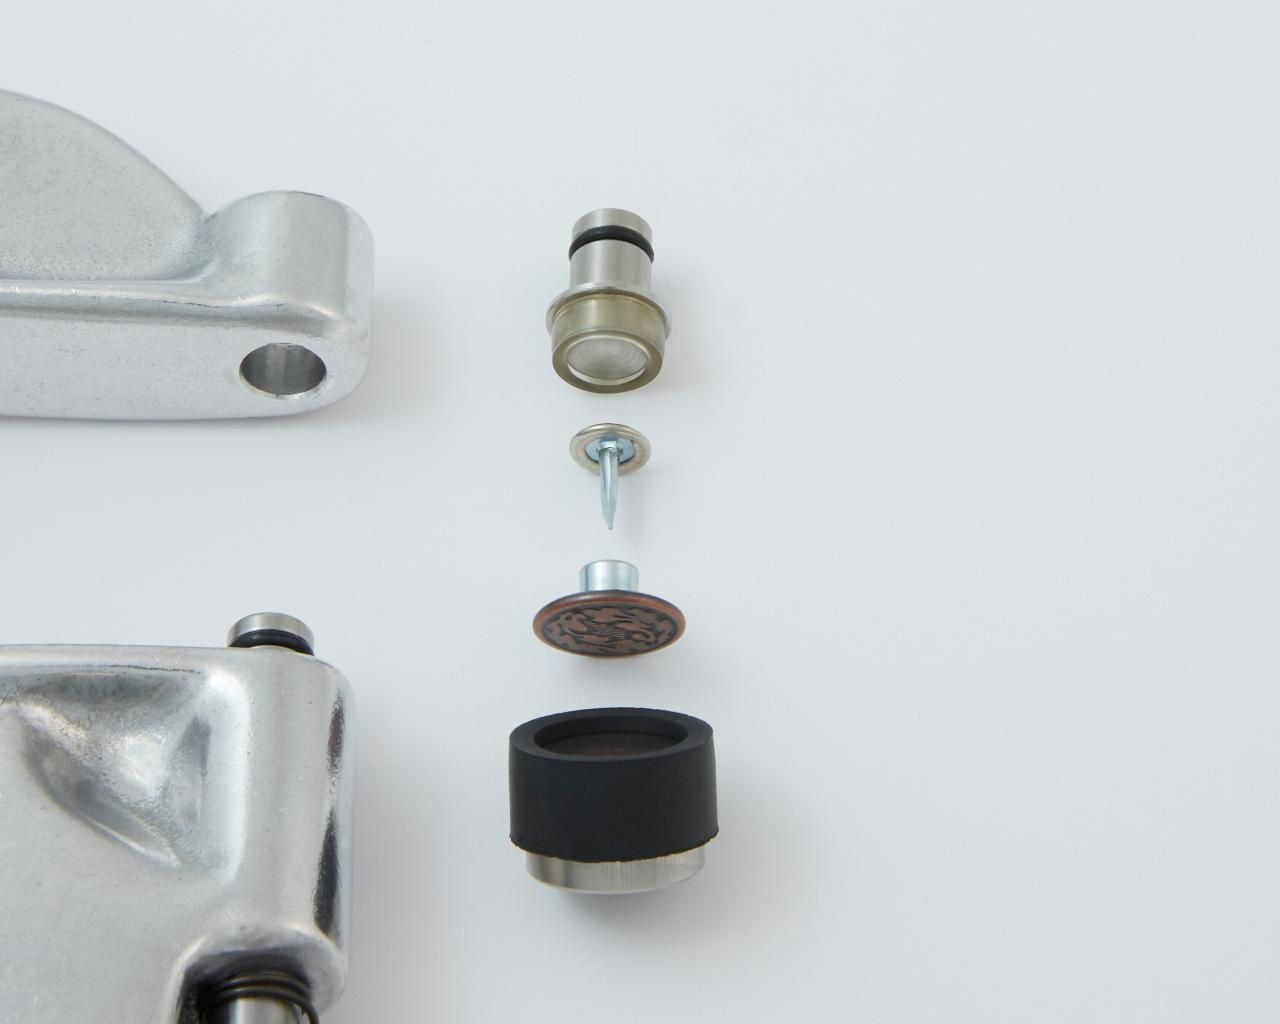
K) Installing Tack Buttons
Press your decorative button/cap fastener onto the lower plunger die. The decorative button/cap should nest into the die and is held in place with a black rubber retainer.
Next, press the back of the tack into the upper die using caution with the tack. The tack should nest nicely into the die and is held in place with a clear cylinder.
Adjust the tightness of the fasteners using a piece of scrap fabric folded to the same thickness/layers as your project. Caution: If your fasteners are too loose, your fasteners may tear out over time. Over tightening may cause distortion to the fasteners and can damage the dies. Place the fabric between the dies and press/close the handle of the tool until all the way closed.
If your fasteners are loose: Turn the adjusting end bolt clockwise to tighten. Then carefully press/close the handle being certain that the fasteners are properly aligned with the dies.
If your fasteners are too tight: Turn the adjusting end bolt counterclockwise to loosen.
You are now ready to install your fasteners on your project.

Tips and Tidbits
- If your fasteners are particularly hard to set, you can set each fastener incrementally. Set your fastener loosely and then open the handle slightly. Then turn the adjusting end bolt clockwise slightly. Keep repeating until you are satisfied with the tightness of the fastener. Remember, if your fasteners are too loose, your fasteners may tear out over time. Over tightening may cause distortion to the fasteners and can damage the dies.
- Let gravity be your friend when installing grommets. Place the grommet through the hole in your fabric and let gravity hold it in place while you position the tool. Doing so also ensures the washer stays on the die while moving the tool into position to set the fastener.
- If your dies are hard to remove or install from the Pres-N-Snap, your O-rings may have become hard. A small amount of silicone spray may be helpful to revive the rubber, or you may choose to replace them. To remove the small “o” ring on the plunger or an upper die, first, slightly close the handle of the tool to raise the plunger. Then, remove the small “o” ring, using something like a dental pick or small nail may be helpful. Do not use a knife or anything sharp. Next, lightly mist the o-ring with your silicone spray. Then reinstall your small “o” ring.
- Do not put silicone spray on the plunger/shaft as overtime the plunger may become gummy.
- You may like to lubricate the plunger/shaft and where the lever meets the adjusting end bolt of the Pres-N-Snap with oil. One single drop occasionally, is all it takes to keep your Pres-N-Snap operating smoothly. We do not recommend sewing machine oil as it is too thin/viscous.
- To remove fasteners from your fabric, we recommend using your favorite pair of side cutters to cut the fastener out. Very carefully insert the side cutters between the fabric and the fastener to cut the barrel of the fastener. The fasteners will likely separate once the barrel inside has been cut. Be sure to not cut your fabric.
Step-by-Step Guide to Using Your Pres-N-Snap® System
Installing snaps, grommets, and specialty fasteners is fast and easy with the Pres-N-Snap® — when your tool is set up properly. Follow the steps below to ensure safe, accurate, and repeatable installations across all compatible fasteners and die sets.
This guide covers:
Choosing the correct die set | Removing and installing dies | Adjusting tool settings | Fastener-specific installation techniques
Tips & Troubleshooting
- Always match dies to fastener brand — even minor differences in diameter or collar depth can affect installation.
- Rotate dies gently when removing or installing — avoid excessive force.
- Inspect O-rings regularly and replace as needed to ensure die security.
- Use Bench Mount for larger grommet sets or high-volume jobs — improves precision and consistency.
- Refer to product diagrams for specific die orientation and part numbers.
Still unsure? Contact us for fast support.
Need Help? We’re Here for You
If you have questions about setup, die compatibility, or fastener installation, our expert team is ready to help.
Address: 427 South Grand Avenue Unit A, San Jacinto, CA 92582
Phone: (951) 654-4627 | Email: info@hooverproducts.com
Hours: Mon–Fri, 8:30 AM–4:00 PM (Closed Sat/Sun)